Preschool Activities, Uncategorized

Veggie Race 🏁🥬 ☀️🥔 🏁

A little over a month ago we set a sweet potato in water to root and grow in our window sill… it took awhile to get going but once it sprouted we set out some celery and romaine lettuce to root as well. The veggie race was off and and after predicting, measuring and graphing their progress the sweet potato was the clear winner!

What you need:

  • Sweet Potato
  • Bottom of celery stalk
  • Romaine lettuce center
  • 3 containers
  • Water
  • Maker
  • Paper
  • Ruler

What to do:

  1. Draw a face on the potato and set in water to root. It took about a month to begin showing growth – be patient!
  2. Once the potato starts to grow, set out the celery and lettuce next to it in a well lit area.
  3. Wait, watch, and record the changes!
Standard
Uncategorized

Pine Cone Parachute 🪂

I received a beautiful birthday gift over the weekend and the packaging was some tissue paper with birds all over it. Before I even opened the gift I joked that I couldn’t wait to find a way to repurpose the tissue paper. Didn’t take long before I caught some windy inspiration and we created this parachute!

What you need:

  • Tissue paper
  • Hole Punch
  • Strings
  • Pine cone

What to do:

  1. Cut 4 equal lengths of string.
  2. Using a hole punch, make a hole in each corner of the tissue paper. 
  3. Thread a string through each hole and tie a knot. 
  4. Tie the other ends of all 4 strings towards the top of pine cone. 
  5. Find a good drop zone, find some wind, and have fun!

To see our parachute in action check out my Instagram @preschoolforyou

For those of you who follow our journey you’ll know that I love a good book pairing. For this activity we read “Parachute” by Danny Parker. Another wonderful book about finding courage within yourself ✨

Standard
Preschool Activities, Uncategorized

Flower Dissection

Have a dying bouquet of flowers? Don’t throw it away just yet! Have your kids cut, dissect, and identify the different parts! In this activity you will be counting, sorting, fine motor strengthening, sharing ideas, and working together… learning through play is the best! 

What you need:

  1. Flowers
  2. Scissors
  3. Bowls
  4. Marker/Paper

What to do:

  1. Label the bowls: Stems, Leaves, and Petals
  2. Using the scissors have your child cut the flowers apart and sort the pieces.
  3. Ask open ended questions: Do all flowers have the same parts? How do the different parts feel? What senses are we using? How do you think flowers grow? Why do you think these flowers are dying?

Standard
Preschool Activities, Uncategorized

Dino Dig

This was a two part activity- both were so much fun! First we made our own dinosaur bones and fossils out of homemade clay, then I buried them in our garden for the boys to dig up. They used shovels and sifters to find the bones and then cleaned them with paintbrushes. I honestly have no idea if they found them all… I’m hoping we discover a few more that were left behind when we plant our vegetables in a few weeks! 

What you need:

  • Baking Soda
  • Cornstarch
  • Water
  • Measuring Cup
  • Pot
  • Shovels & Sifters
  • Skewers
  • String

What to do:

For the clay:

  1. Mix 2 cups baking soda and 1 cup cornstarch.
  2. Stir in 1 1/2 cups water.
  3. Place over medium heat, continuously stirring until it thickens and becomes dough like (about 10 min).
  4. Let cool and knead – adding cornstarch or (baking soda) as needed to reduce stickiness.
  5. Use immediately or wrap in plastic wrap and store in refrigerator. 
  6. To make bones we just used our hands and molded until they looked like bones. For the fossil prints we used toy dinosaurs to make footprints and also pressed different parts of their bodies (teeth, tail, etc.) into the clay.

For the dig:

  1. Find a good plot of dirt and dig to loosen the soil if necessary.
  2. Use 4 skewers and string to rope off the prepared area.
  3. Bury your bones and fossils – not too deep!
  4. Invite your child to be paleontologists and dig for the dinosaur bones.

Standard
Uncategorized

Tiny Boat 💨⛵️

This simple boat was so much fun and a great lesson in the power of wind. I grew up sailing with my dad on our own tiny sailboat and I’ve always loved it – there’s just something about the moment when the wind hits the sail and you zoom across the water – it really shows the beauty of Mother Nature ✨

What you need:

  • Mason jar lid
  • Small piece of clay or play-doh
  • 2 sticks (one shorter than the other)
  • Coffee filter
  • Scissors
  • Glue

What to do:

  1. Place a small dab of clay in the middle of the mason jar lid.
  2. Put the longer stick in the clay and secure with glue.
  3. When the stick is sturdy, glue the other stick perpendicular to the other one.
  4. Cut the coffee filter in a triangle shape with the sides the same length as the sticks.
  5. Glue the coffee filter triangle to the sticks.
  6. Let dry completely.
  7. Test it out in a puddle or a sink!

Standard
Preschool Activities, Uncategorized

Growing Grass on Water Beads

Spring brings light, new growth, and this year more than ever, it feels like a new beginning… to celebrate we embarked on a new seed sprouting experiment – growing wheat grass on water beads 🌱

Over the course of the past week we watched the wheat grass seeds sprout, grow roots, and thrive in the sunlight ✨

What you need:

  • Water Beads
  • Wheat grass seeds
  • Clear container

What to do:

  1. Soak water beads so that they absorb all the water.
  2. Place water beads into container, about 2/3 full.
  3. Sprinkle some wheat grass seeds on top.
  4. Wait, observe, predict, measure, document!
Standard
Uncategorized

Stars in a Jar

If you’ve followed along on our journey you know that I love a good mason jar craft… so naturally we had to make one to help expand our moon study to the rest of the sky! 

Thanks to acorns.and.aprons for providing the perfect constellation printable for this project!

What you need:

  • Mason jar
  • Foil
  • Push pins
  • Constellation pictures
  • Piece of cardboard
  • Twinkle lights

What to do:

  1. Cut a piece of foil to fit the inside of your jar. If it’s a large jar, it may be easier to work with two smaller pieces of foil.
  2. Pin foil down onto a piece of cardboard and then pin constellation pictures on top of the foil. 
  3. Use thumb tack to poke holes where the stars on the constellation are (we wiggled the pin around to make these stars bigger). 
  4. Remove pictures and poke smaller holes all over the foil to create smaller stars. 
  5. Remove all pins and roll foil (like a burrito) so that you can put it into the jar. 
  6. Place rolled up foil in jar and use a long object (like scissors) to push the foil against the side of the jar.
  7. Add tea lights and screw on the lid.
  8. Take to a dark room and try to find and identify all the constellations!
Standard
Preschool Activities, Uncategorized

Fun With Ice!

We’ve had below freezing temps for weeks in the Chicago area so the boys and I have been experimenting with different ways to freeze ice and objects outside! If it isn’t cold where you live – just use your freezer!

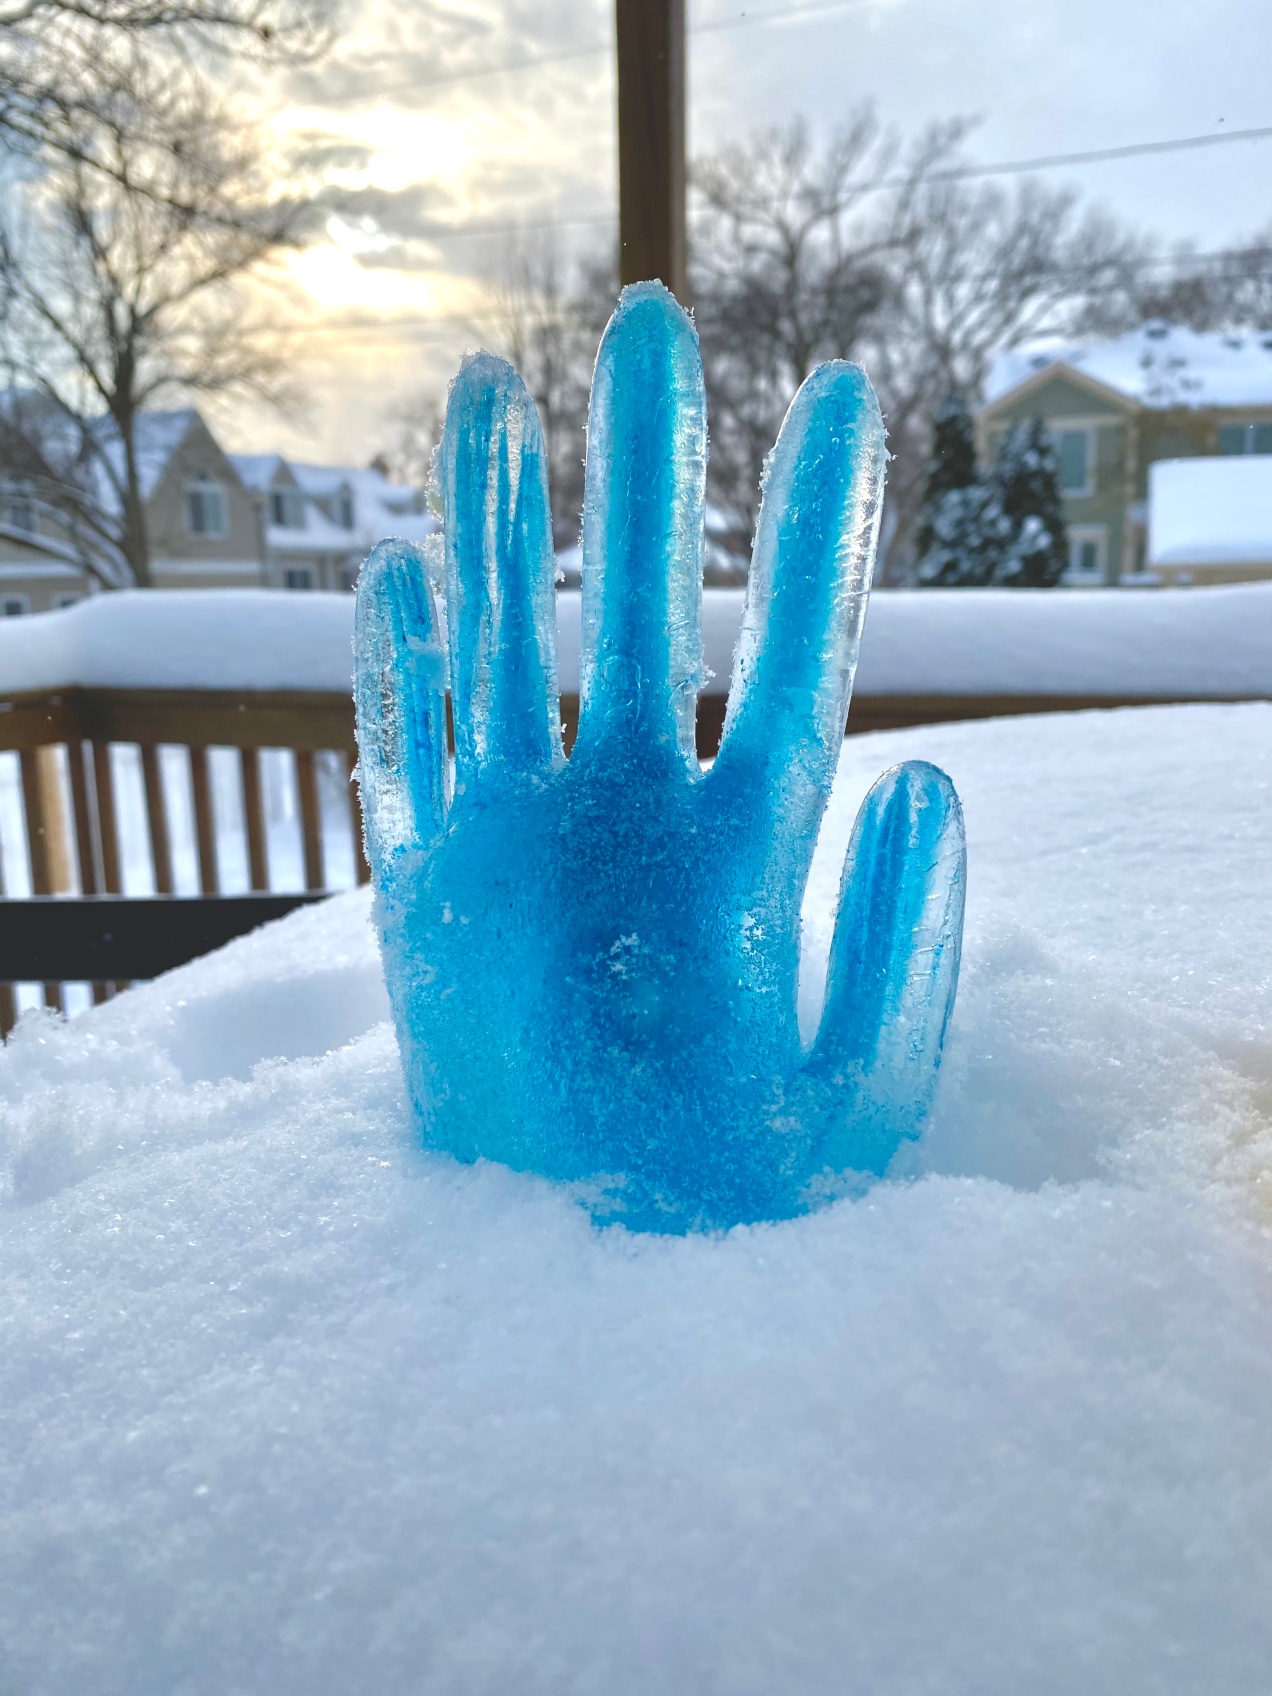
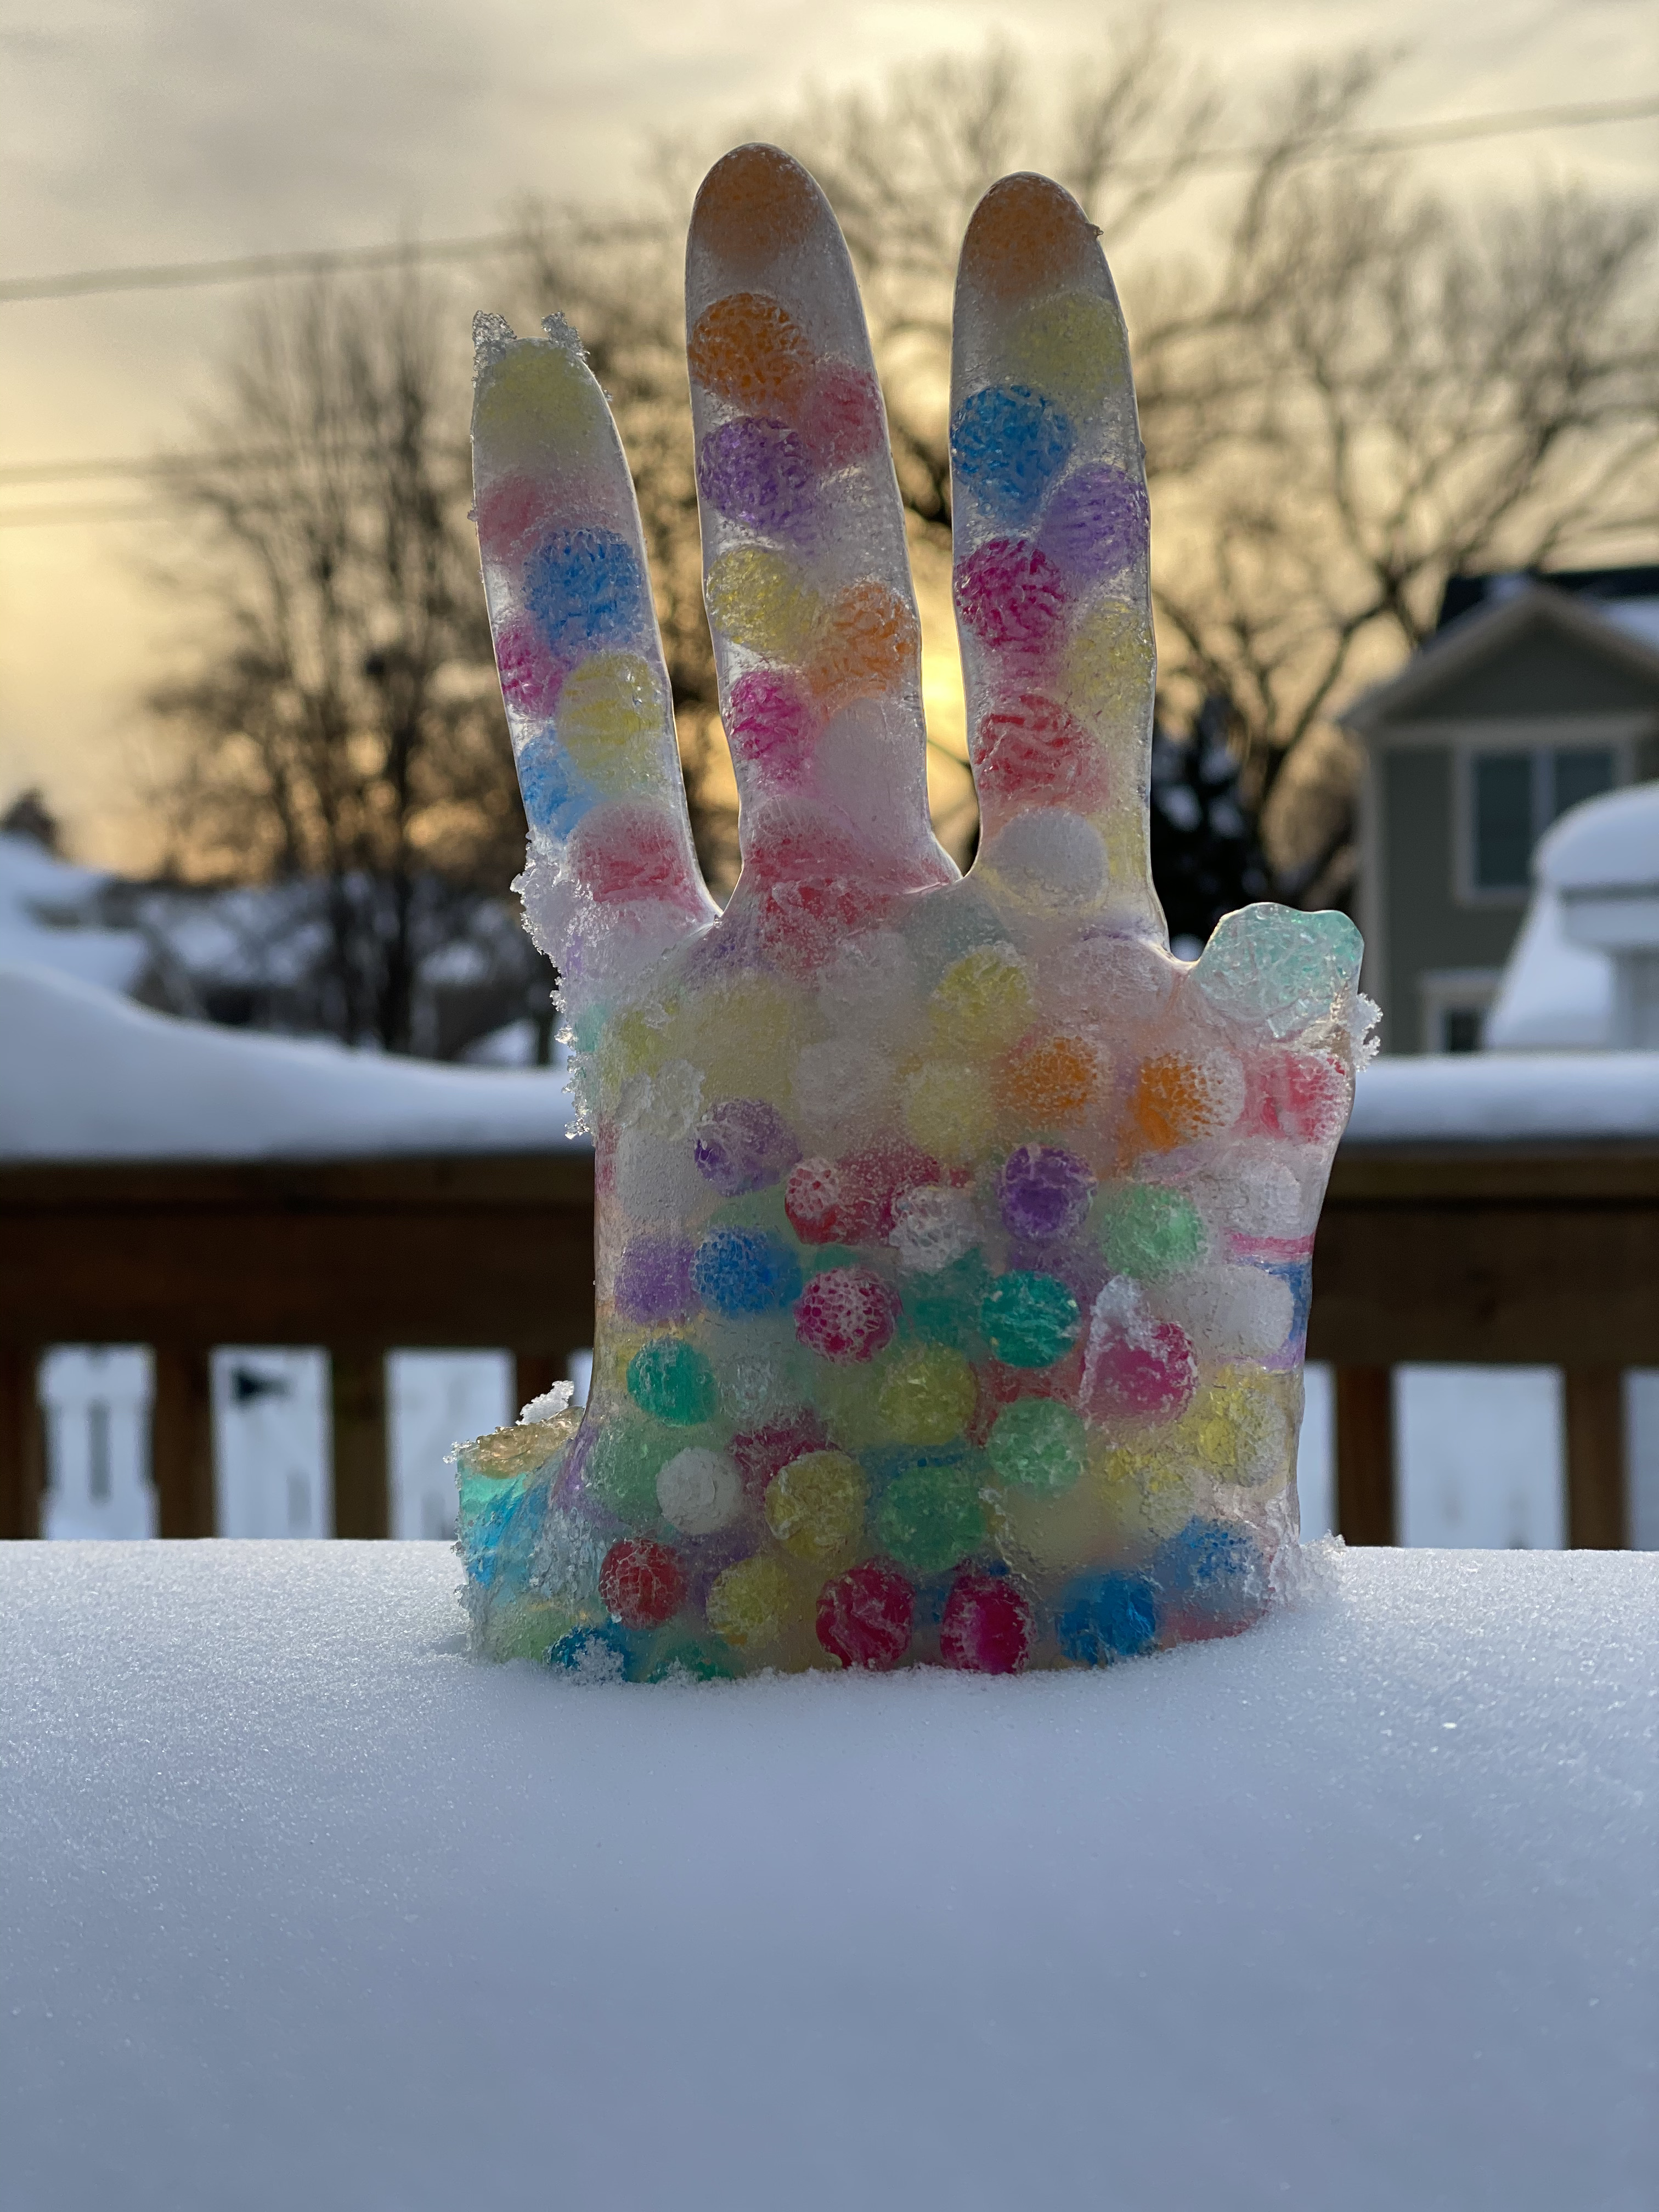
  1. Frozen Hands: Fill plastic gloves with colored water (or water beads). Attach the gloves with clothespins on a skewer/stick and place so that it hangs into a deep bowl or container. If you lay the glove directly on the ground or table outside you won’t be able to pick it up! Useful tip: Bring them inside to warm up a little it before trying to remove the gloves – if not you’ll break the fingers!

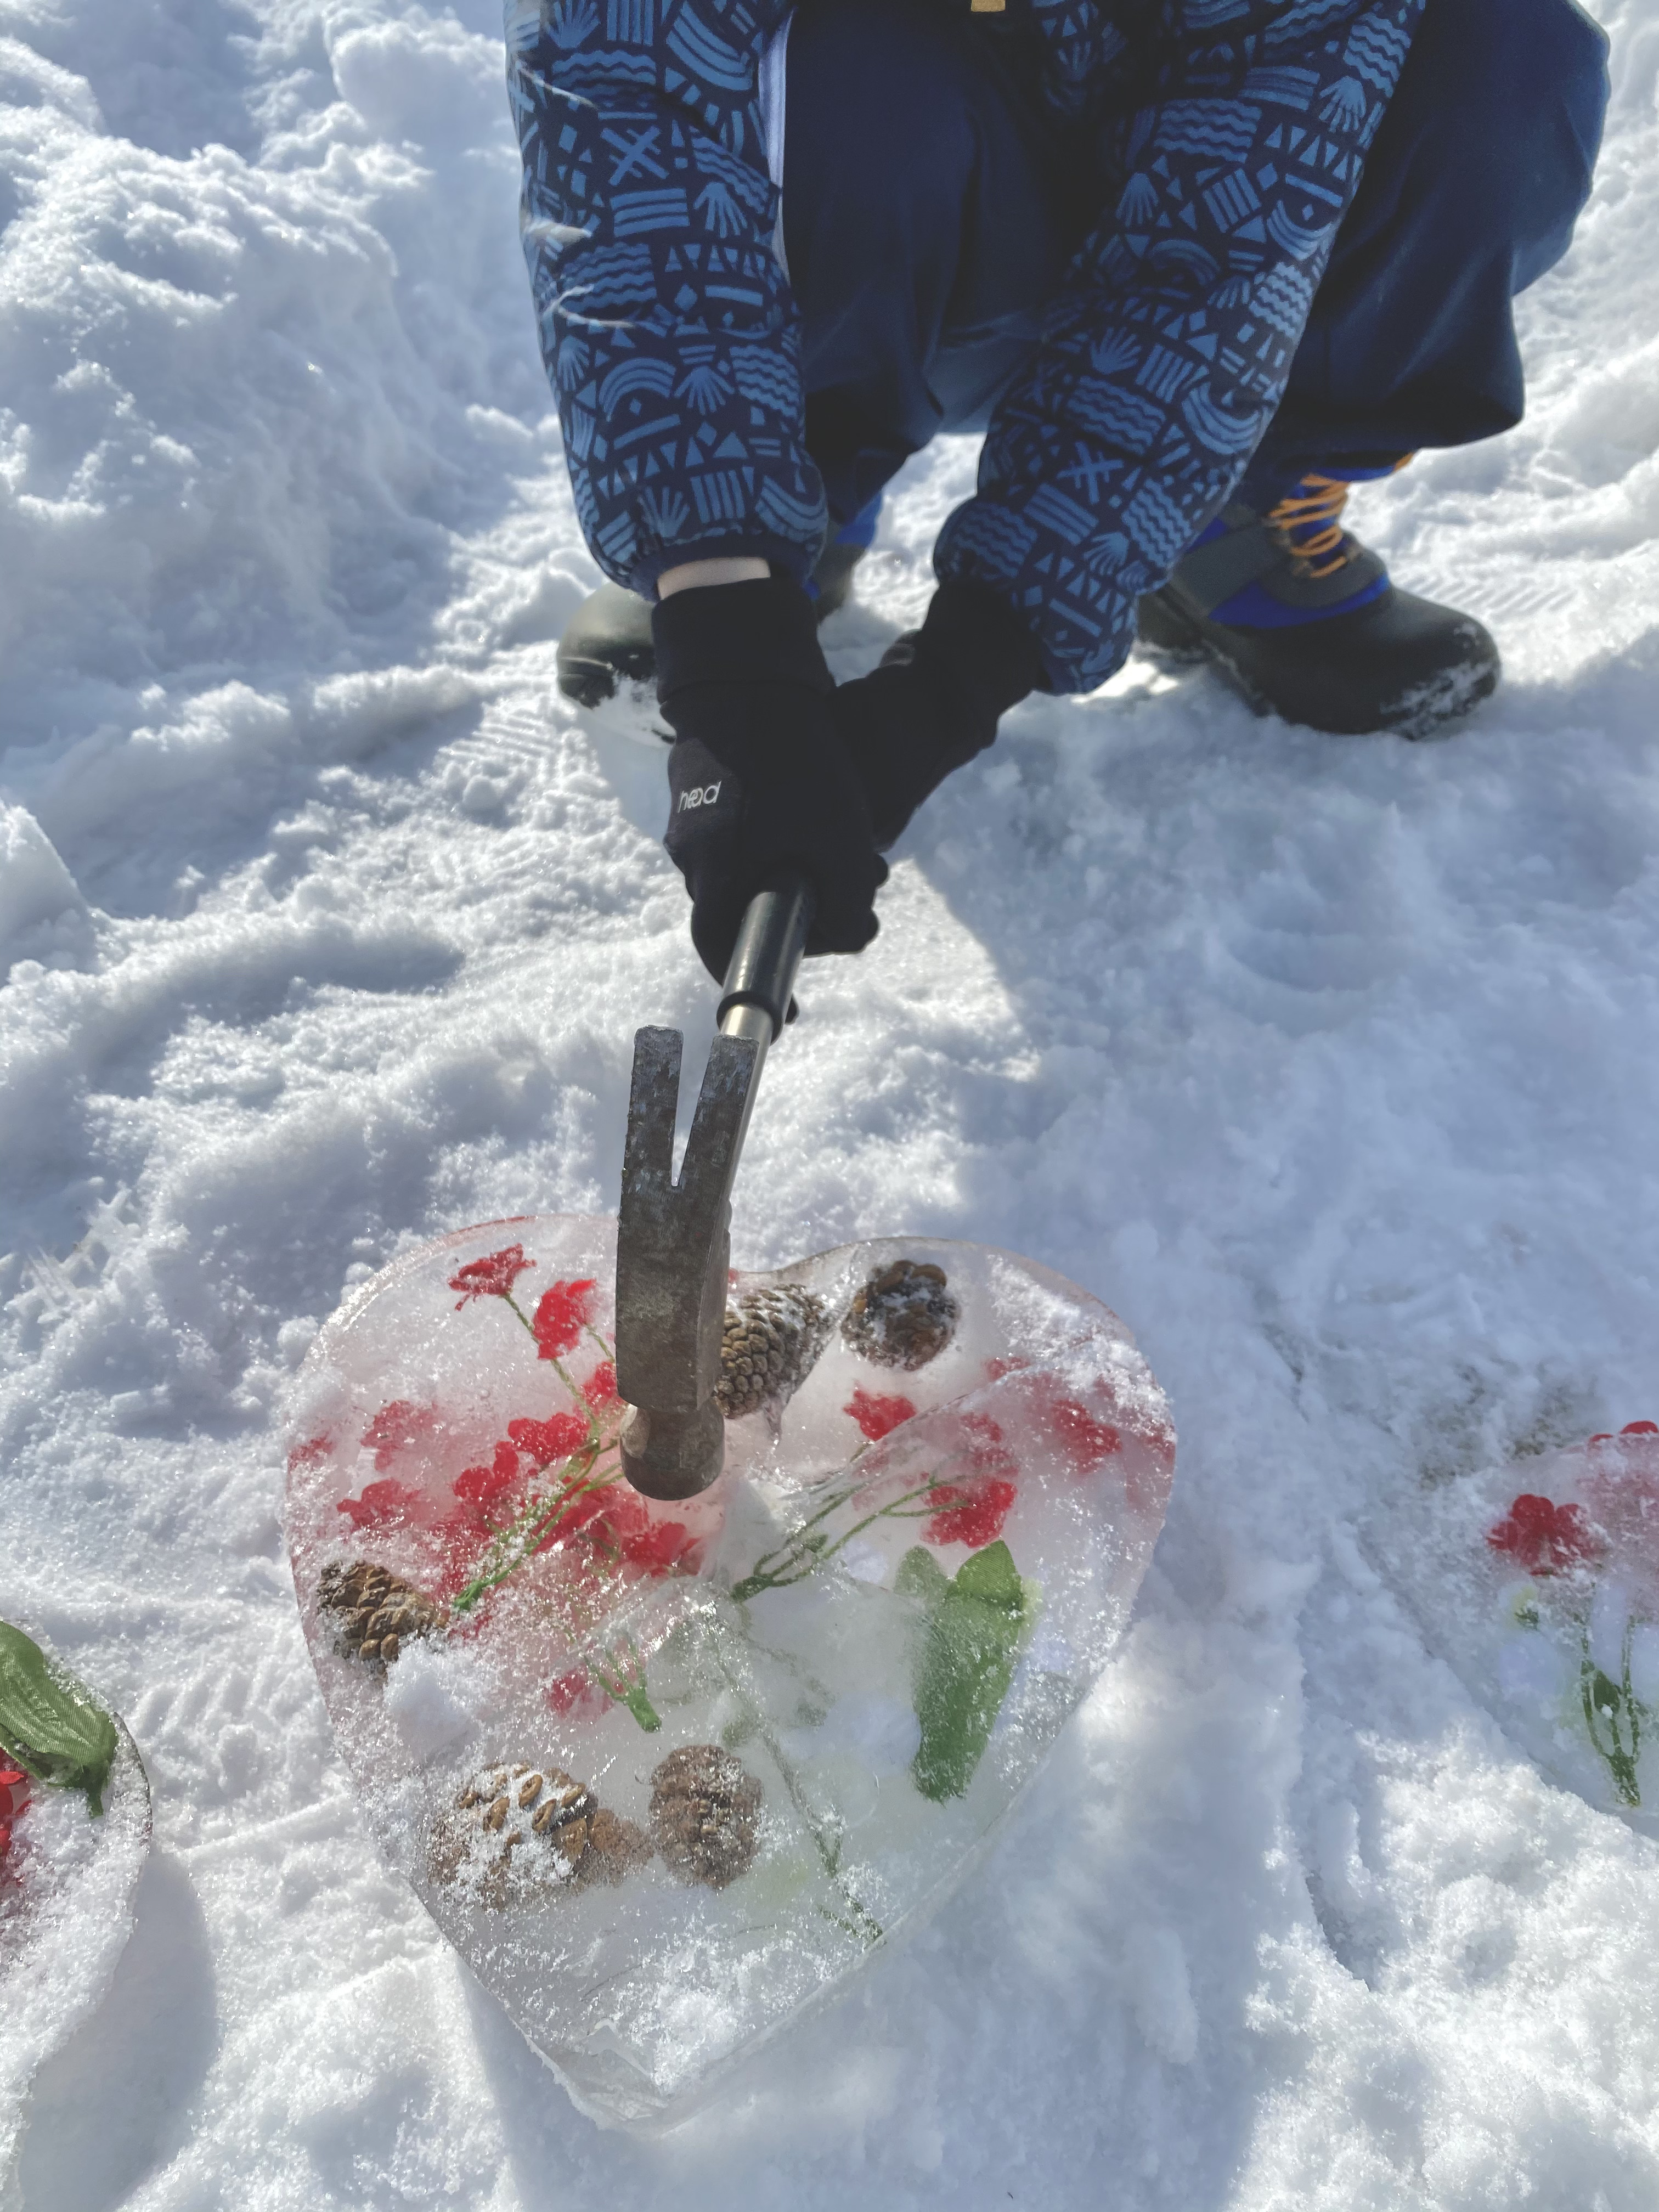
2. Don’t Break my Heart: For Valentine’s Day this year we made beautiful frozen hearts full of nature – and then broke them to pieces with hammers! We used heart shape candy boxes, a heart shaped pan, and even made our own heart to fill out of foil.

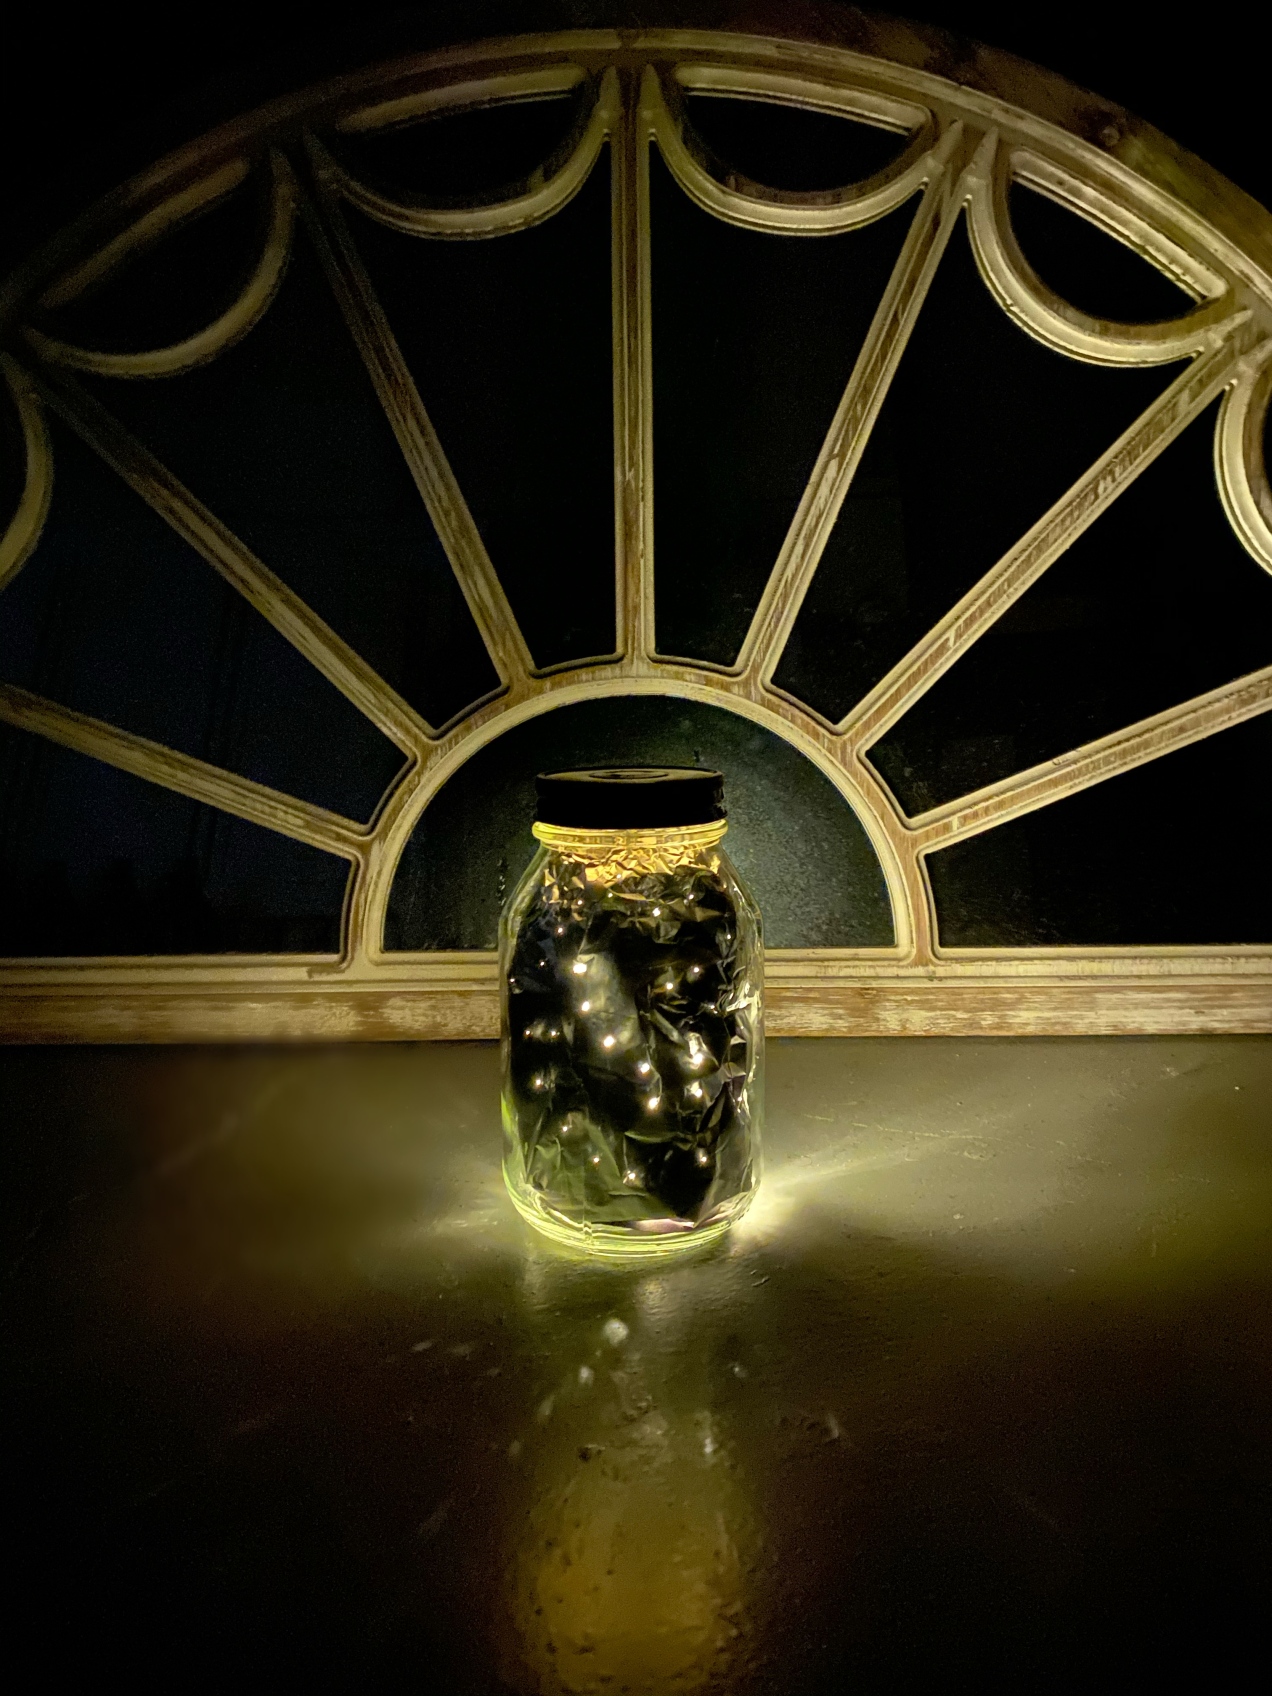
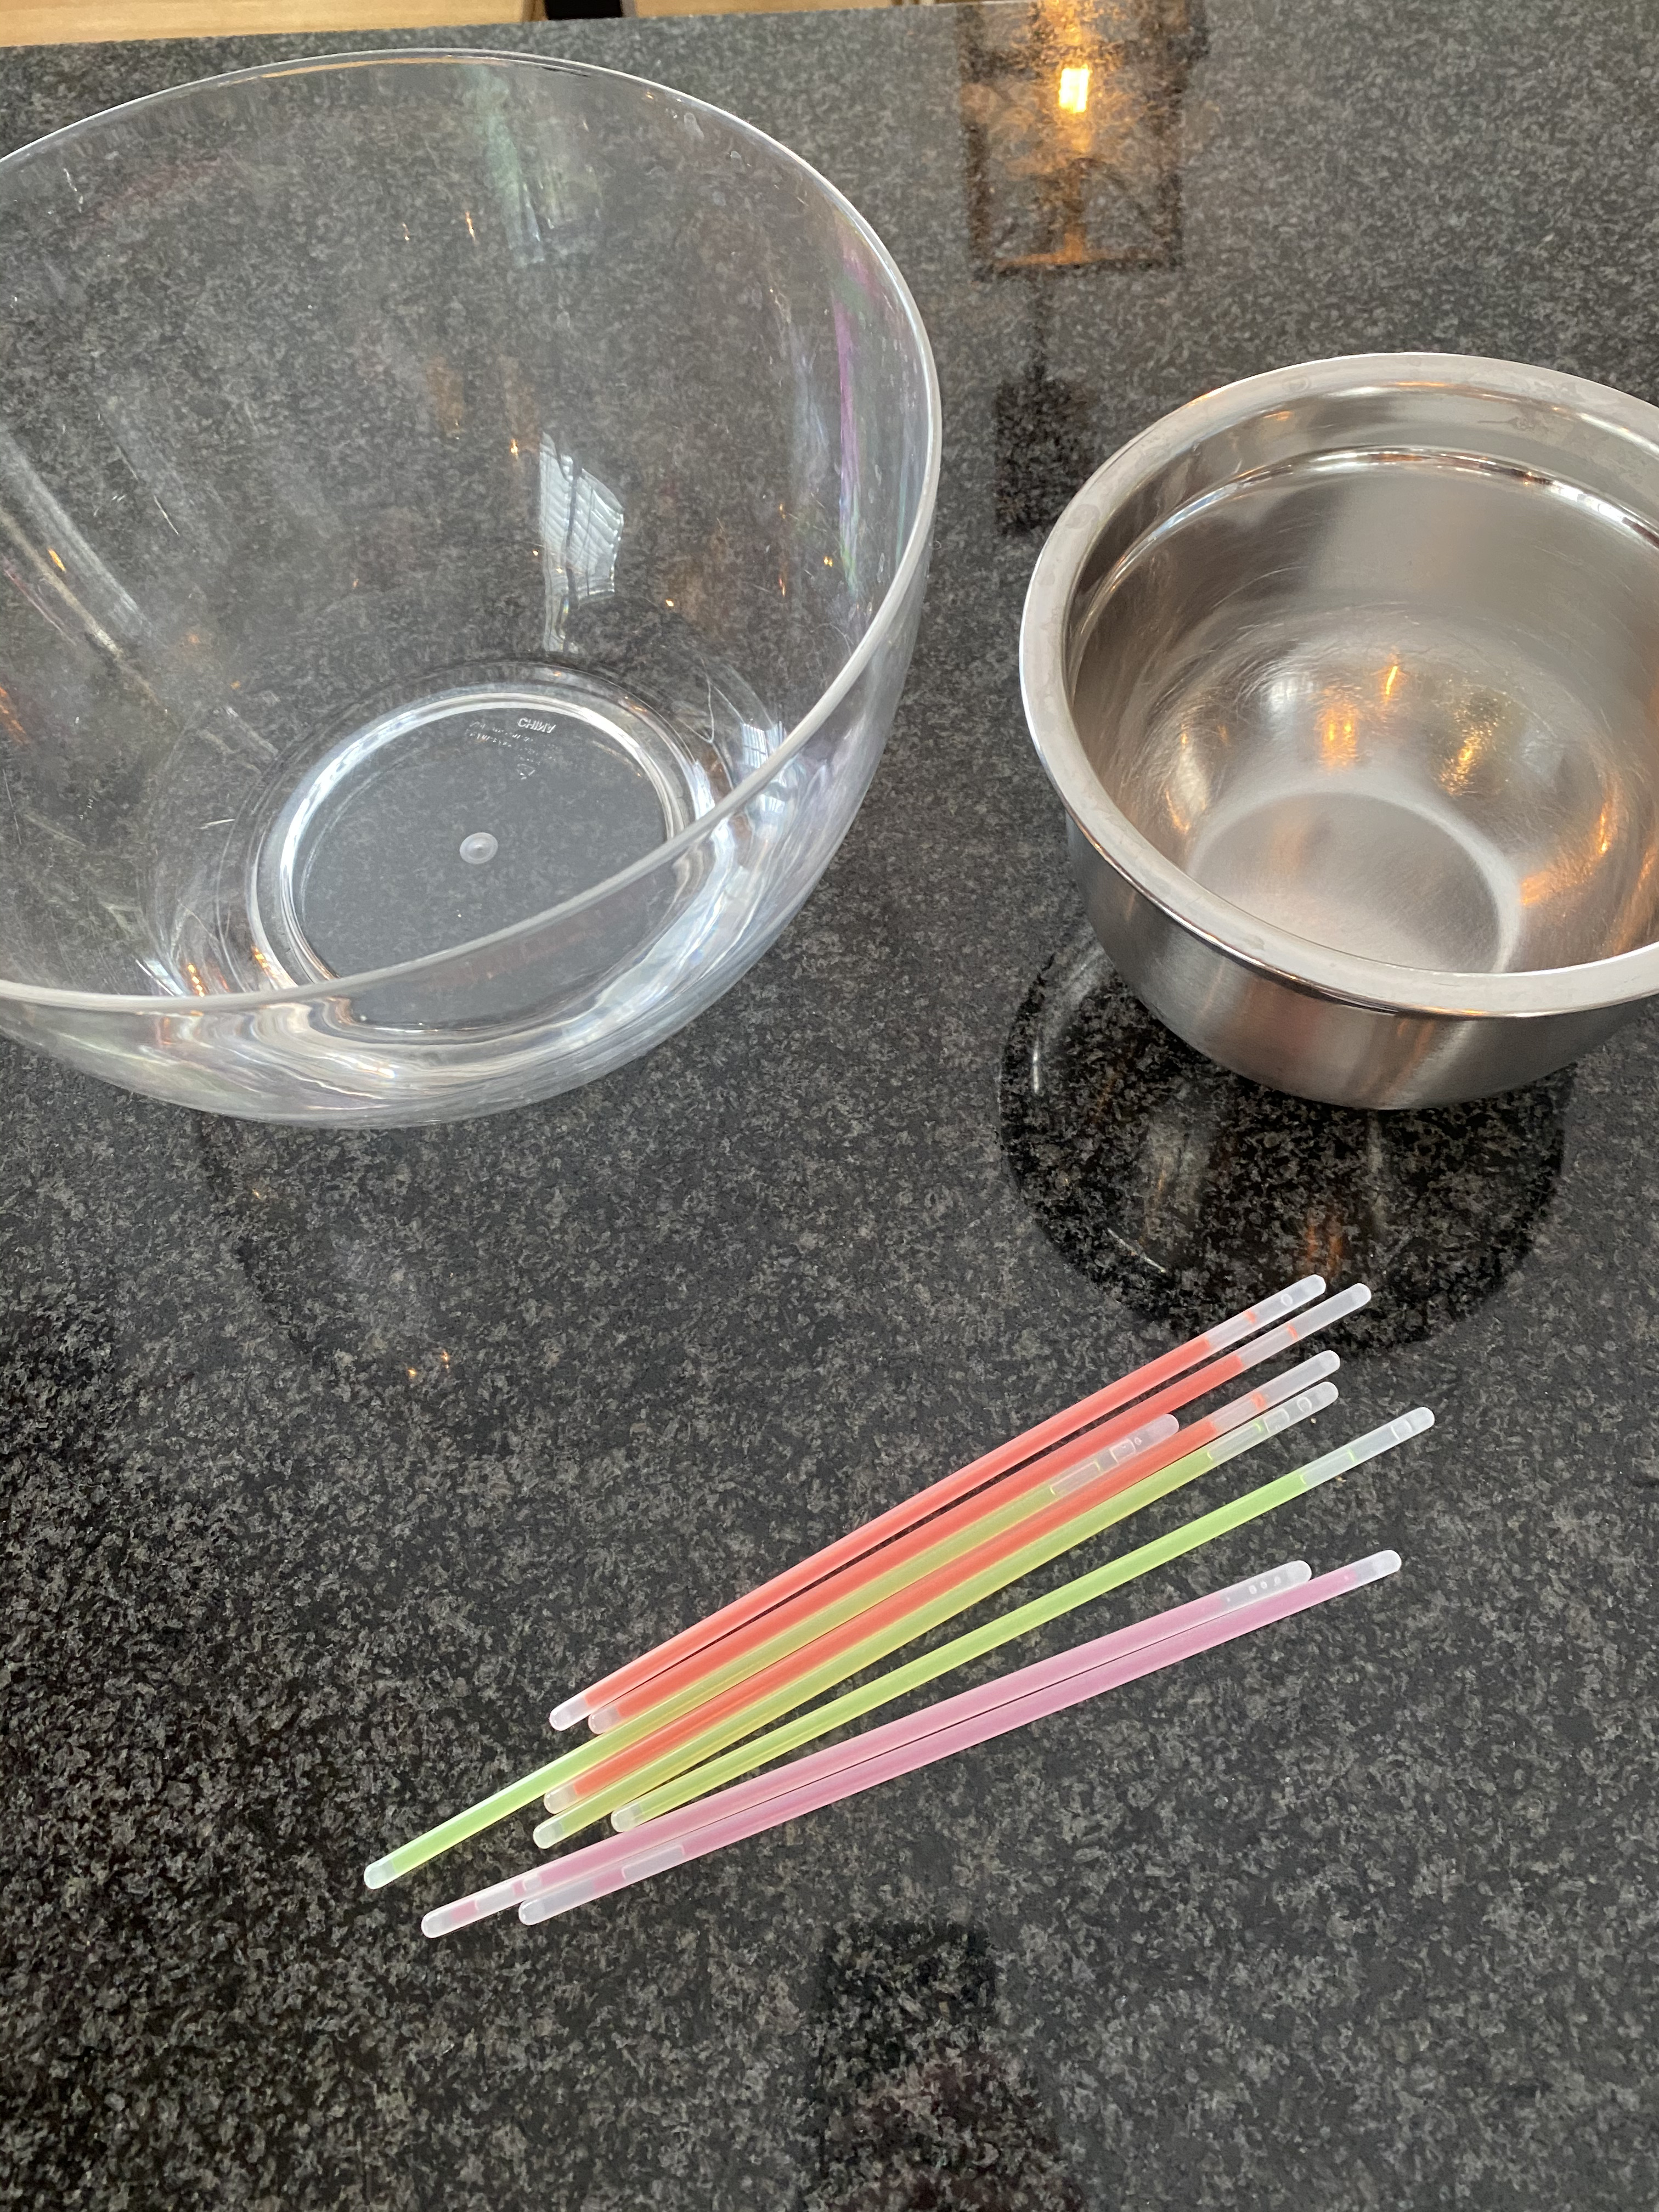
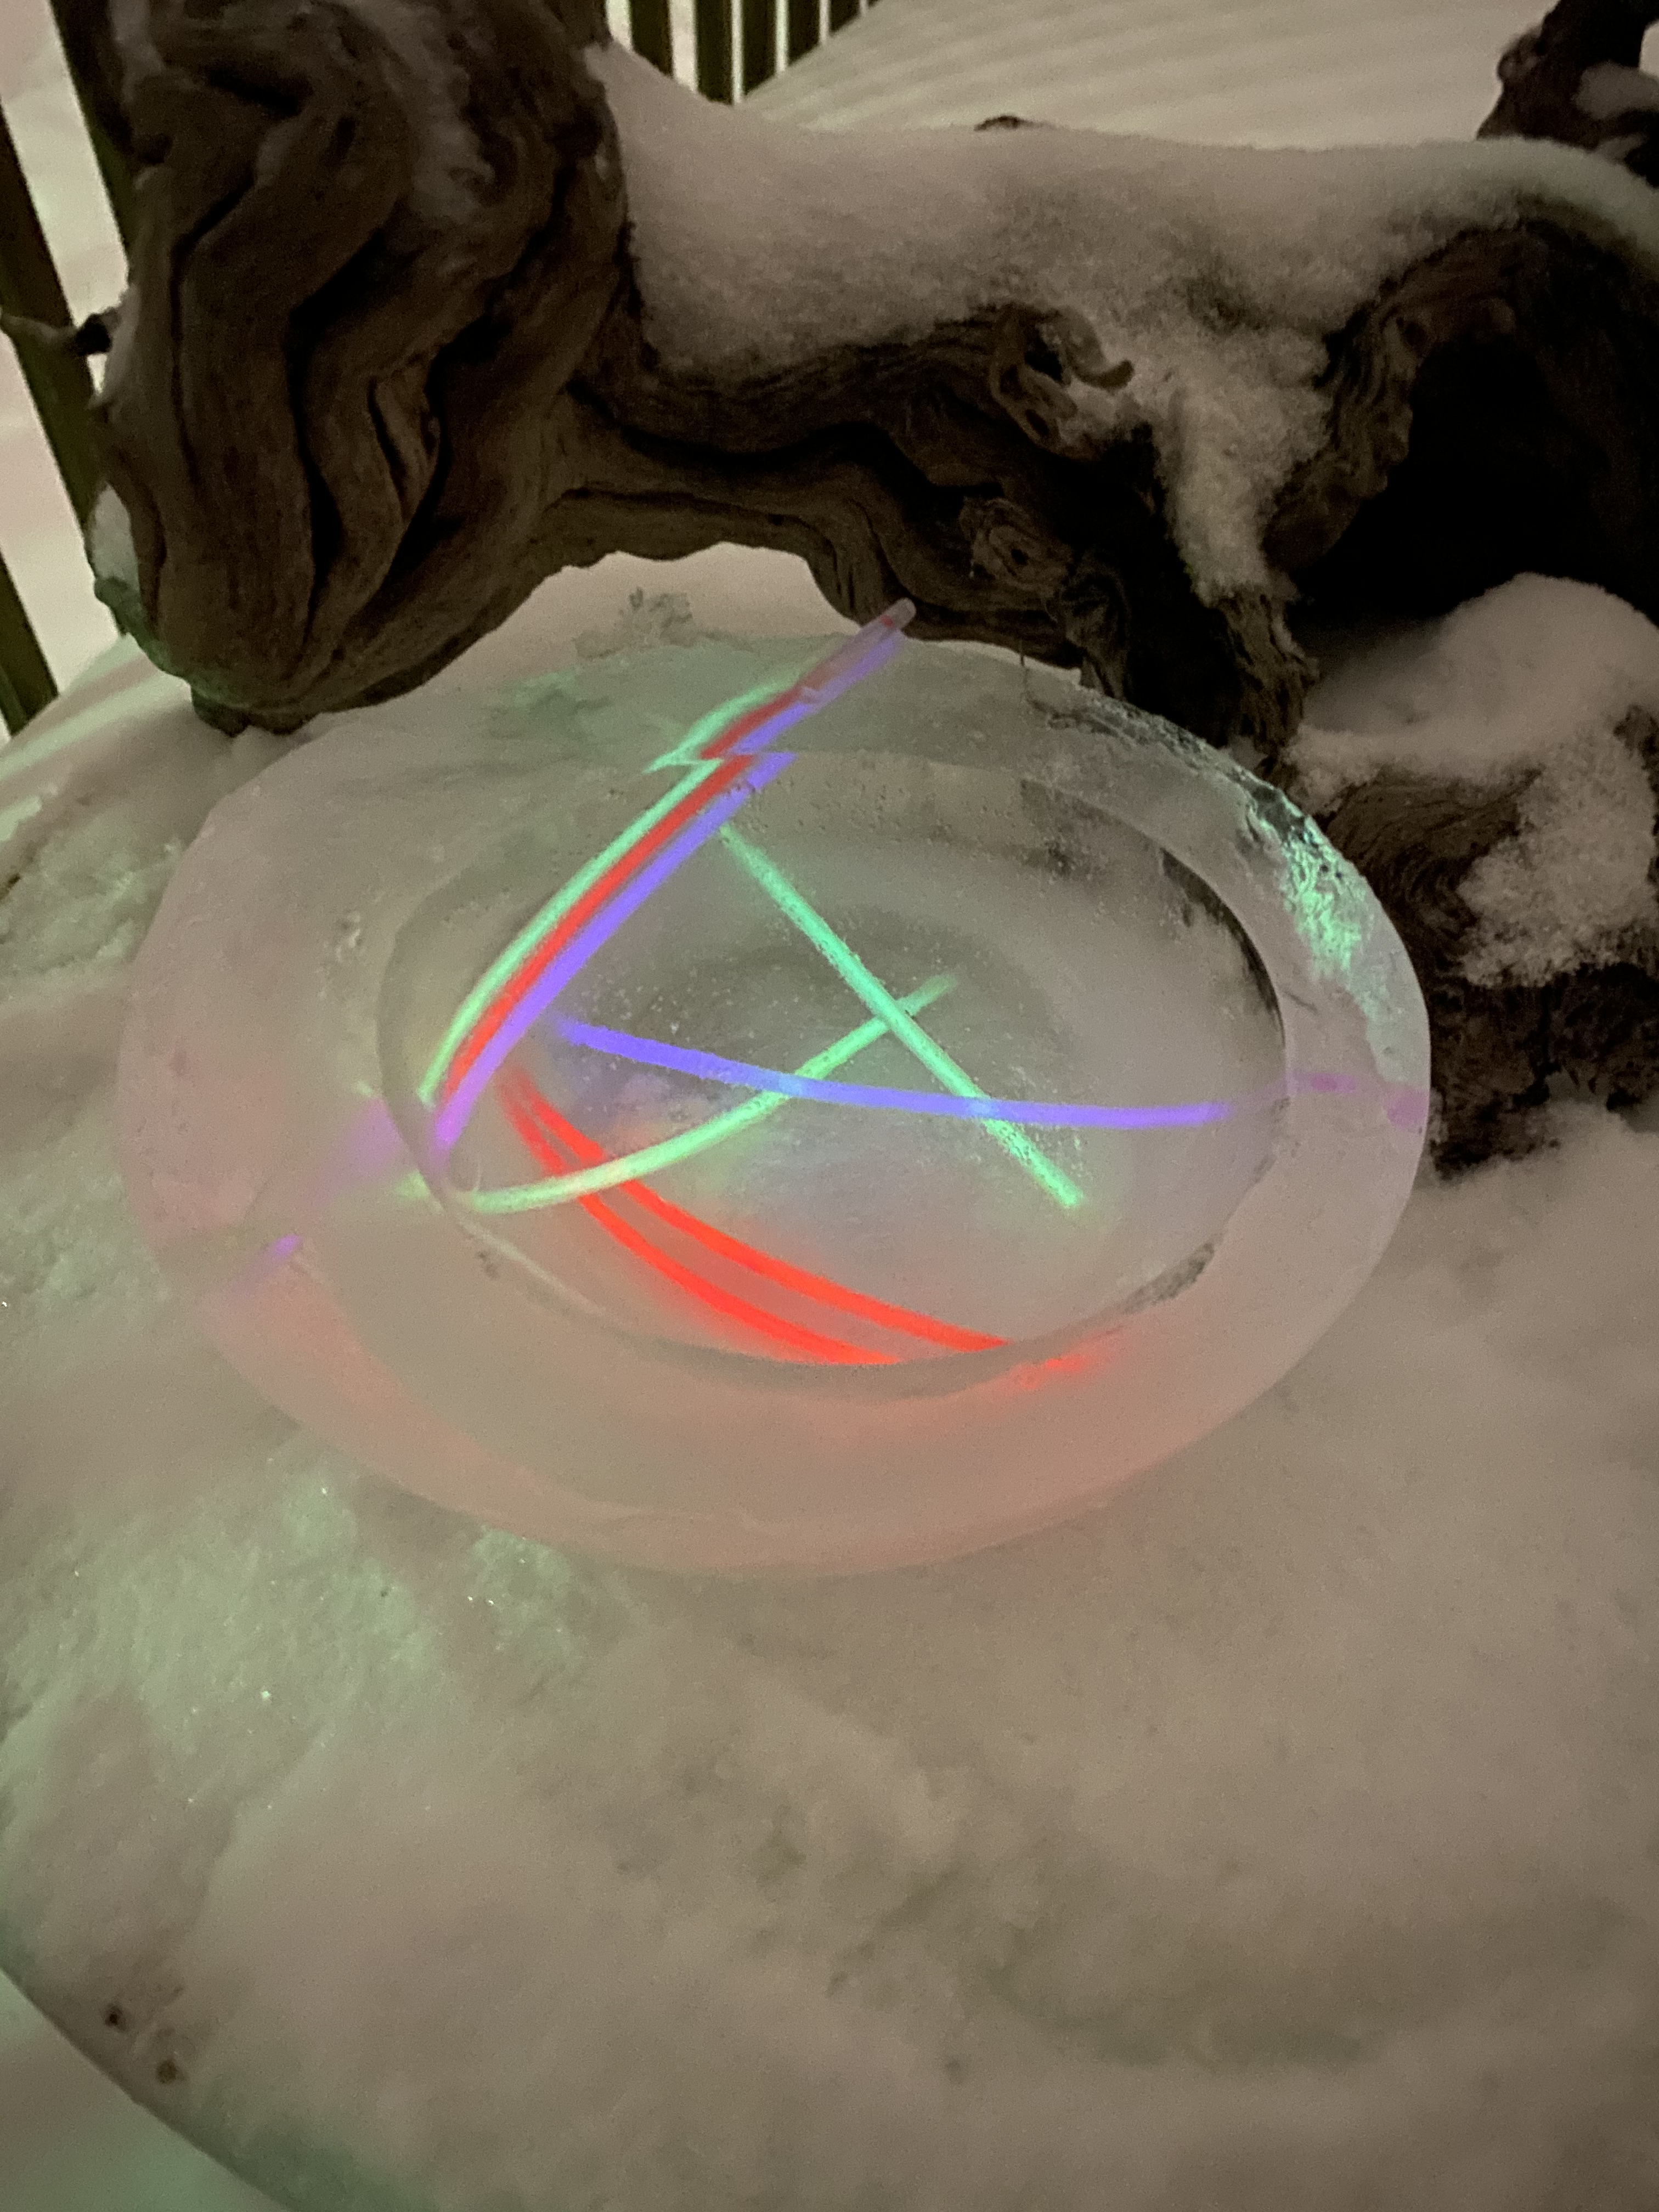
3. Ice Bowl: You can fill your bowl with anything but we chose glow sticks for a fun night time reveal. Fill a large bowl with water, add objects you want frozen inside of your bowl (glow sticks, pine cones, legos, etc.). Place a smaller bowl with a heavy object in it to keep it from floating around. Place outside or in freezer until frozen. Makes a great holder for snowballs!!!

4. Frozen Bubbles: This will only work if it’s really cold outside, but the best part is it’s super easy! Try and get a bubble to land on your bubble wand to watch ice crystals form… I learned a few tricks after a couple failed attempts!

Trick #1: Heat up your bubble solution in the microwave before heading outside.

Trick #2: Add a few drops of coloring to make the bubbles easier to see when they land in the snow!

Standard
Preschool Activities, Uncategorized

DIY Maple Syrup Lollipops

With temps averaging around 10° F this week I’ve been on the hunt to find quick activities to give us opportunities to get outside – even if it’s just for a few minutes at a time. My oldest LOVES maple syrup and I remembered seeing this activity on instagram recently so I thought I’d give it a try!  Although the recipe calls for real maple syrup, all we had in the pantry was Log Cabin… it worked but the result was a hard candy rather than taffy-like. I think the important thing when choosing syrups is for it not to have high fructose corn syrup. Either way – it’s super fun and tasty!

What you need:

  • Real maple syrup – the amount you use depends on how many lollipops you want. I used about half a cup which made 5 lollipops.
  • Pan and spoon
  • Skewers or popsicle sticks
  • Snow! (If there is no snow where you live, crush some ice and spread it out on a baking sheet!)

What to do:

  1. Have an outdoor space ready for use – a clean patch of flat snow and a place to set down your pan.
  2. Inside, pour maple syrup into pan (I used our camping pan knowing it was going to get sticky and messy!)
  3. Heat until boiling while continuously stirring – will take between 5-10 minutes depending on the type of syrup.
  4. When syrup is nice and hot run it outside quickly!
  5. Pour a spoonful on the snow.
  6. Place skewer/popsicle stick on top of syrup.
  7. If you move quickly you can mold it into shape – be fast because if it’s as cold as it is here it hardens in a flash!
Standard
Preschool Activities, Uncategorized

Thirsty Plants Experiment

Why do plants need water? To stay alive of course! Adding color to water is a great experiment to show how different plants “drink” in order to stay alive. This isn’t an instant gratification experiment, it takes a few days so be prepared to wait a little while for the results.

I’ve done this experiment in the past with white flowers and also with celery, but my boys wanted to test other items so we looked in the fridge to see what we could find. We settled on celery, carrots, and cilantro – but you can use any kind of plant!

What you need:

  • Flowers, celery, or plant of any kind
  • Food Coloring
  • Clear jars or containers
  • Water

What to do:

  1. Fill the jars with water and add a few drops of food coloring – the bigger the jar the more food coloring needed.
  2. Add your plants.
  3. Make a list of questions and predictions.
  4. Wait and see what happens! After 24 hours you should be able to see some color changes!

Standard