Uncategorized

More Self Portraits!

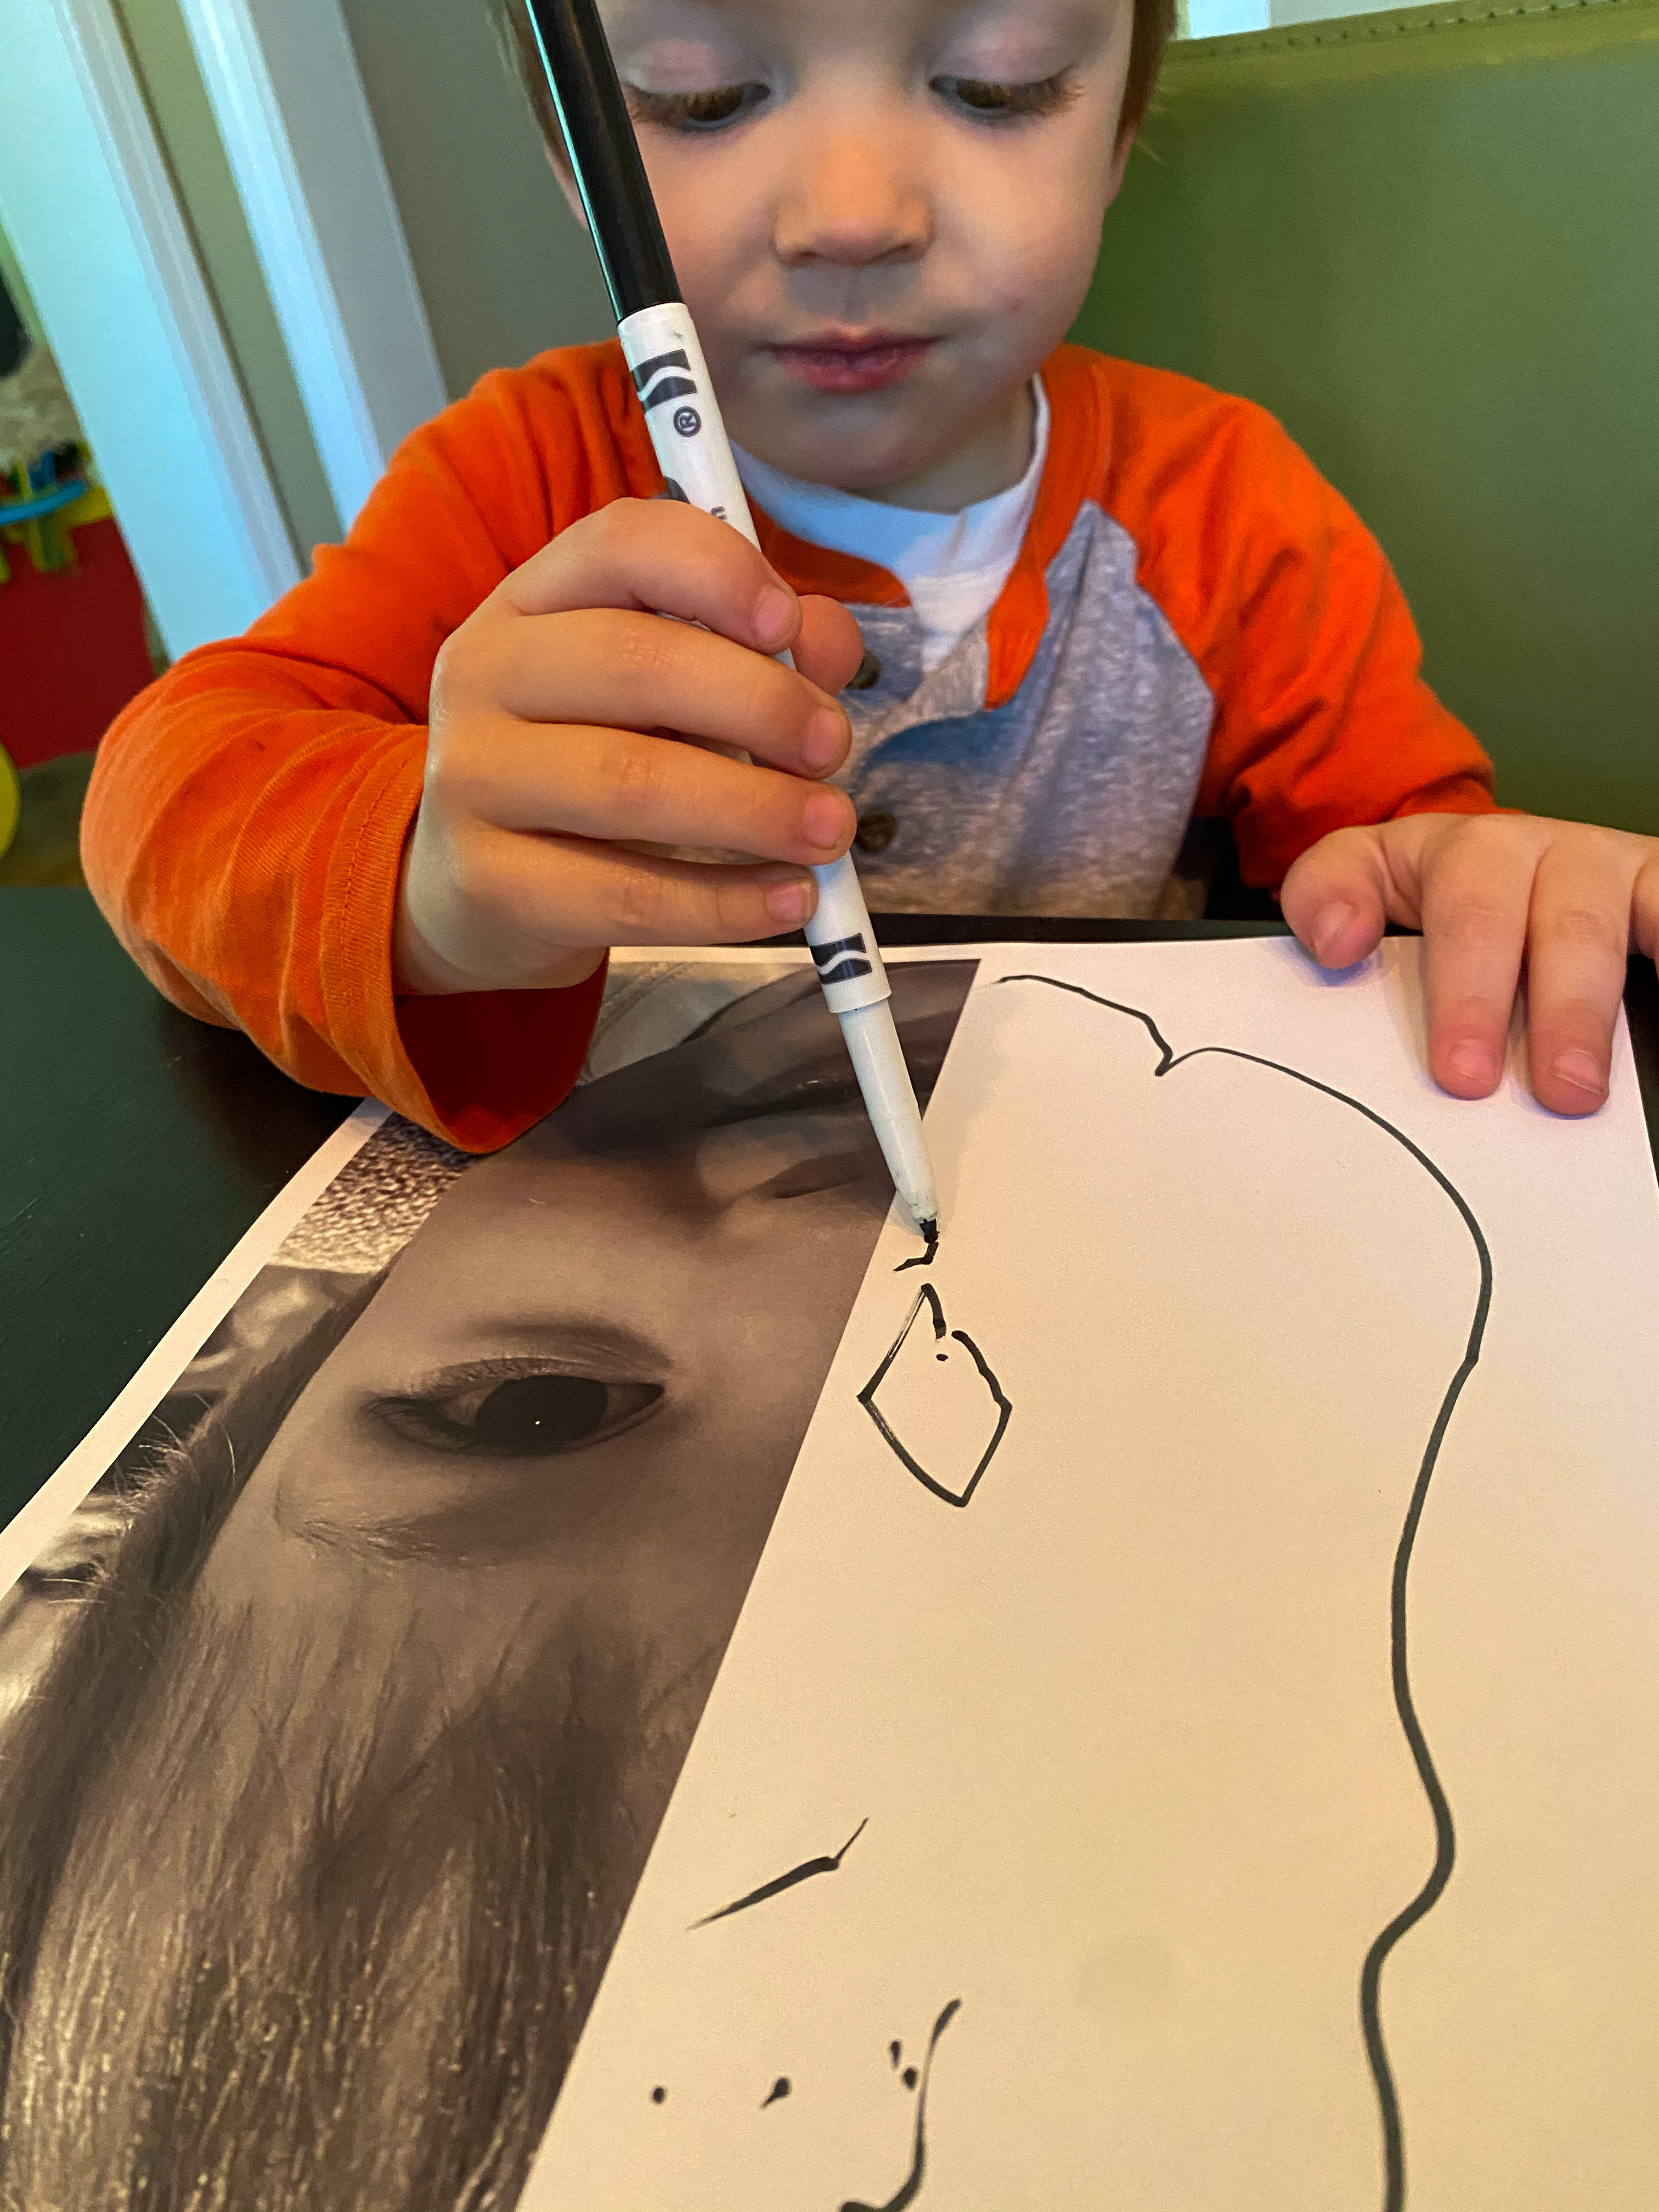
I have posted on the benefits of self portraits in the past (check it out here if you missed it!), but I thought I’d re-visit with a fresh take! Self portraits don’t always have to be a simple drawing of yourself – why not change it up? For this portrait we discussed symmetry as we looked in the mirror. I then printed pictures of half of their faces and had the boys complete the other side. Some other mediums to use when exploring self portraits are: clay, wire, chalk, and paint… get creative!

What you need:

  • Printed photo of half a face
  • Marker

What to do:

  • Look in a mirror – discuss what you see!
  • Introduce the word “symmetry” and explain what it means. Revisit the mirror and see how symmetrical your faces are!
  • Offer the half picture of your child and have them complete the other side.
  • If you have done self portraits in the past, take them out and compare the progress – the proof is in the details 😉
Standard
Uncategorized

Fingerprint Dandelion

On our walks this week we’ve been noticing tons of puffy white dandelions and their seeds dispersing in the wind. My littlest is determined to send them flying but he just can’t quite get it yet 😉 These pictures were simple to make yet I will treasure the tiny fingerprints forever!

What you need:

  • Paper
  • Marker
  • White paint

What to do:

  1. Draw a stem and then add different lengths of lines protruding from the center.
  2. Have your child dip their finger in the paint and add small “puffs” on the lines.

Standard
Preschool Activities, Uncategorized

Dandelion Drawings

While walking yesterday the boys noticed the abundance of dandelions that had popped up the past few days – while picking them I was reminded of my childhood and rubbing them all over my cheeks and hands trying to turn myself yellow. However, rather than rubbing them on our skin, I offered a white piece of paper and using the dandelions we wrote letters, filled in shapes, and drew a little yellow house. 

What you need:

  • Dandelions
  • White Paper

What to do:

  1. Go outside and pick some dandelions.
  2. Place a piece of paper on the ground or table and “write” with the dandelions by rubbing on the paper.

Standard
Preschool Activities, Uncategorized

Wind Chime

We have seen and felt the wind this week so now it was time to take a moment to stop and listen. Its funny how long it took to capture only the sounds of our chimes… we kept getting interrupted by cars, dogs, neighbors and airplanes. It can be so noisy in the bustle of the day but when you do find that moment of peace and can hear only nature – it’s music to your ears.

Unfortunately this platform does not support video but if you would like to see our wind chimes in action check out my Instagram @preschoolforyou  🙂

What you need:

  • Mason jar lids (without the middle circle part)
  • Contact paper
  • Flowers
  • Twine
  • Bendy stick
  • Scissors
  • Hole Puncher
  • Glue

What to do:

  1. Cut circles out of the parchment paper the same size as the middle of your mason jar lid. You will need two circles for each lid.
  2. Fill the circles with flowers and/or items from nature. *Helpful tip: The night before you plan to do this project, press your flowers to help them lay flat on the parchment paper.
  3. Place another parchment paper circle on top of the one with flowers to seal.
  4. Punch a hole in the top of the circle.
  5. Glue the circle inside of the mason jar lid.
  6. Tie a piece of twine to the lid.
  7. *Repeat steps 2-6 for as many “chimes” as you want.
  8. Take your bendy stick and tie it in a circle.
  9. Tie the lids onto the stick. *When I first did this project I wasn’t happy with the amount of sound it made so I added some hollow mason jar lids in the center and it made it much better! You could also add other metal objects such as old silverware or nails, screws, etc.
  10. Once all your chimes are tied into place hang outside and wait for the wind to blow!
Standard
Preschool Activities, Uncategorized

April Showers

April in the Midwest means one thing – rain. But you know what they say… April showers bring May flowers! Trying to stay positive during these dreary days – it’s only a matter of weeks until the sun will be shining, our garden will be growing, and we will be exploring the summer wilderness ✨🌿

This was our first time melting crayons with a hair dryer and honestly it was a lot messier than anticipated! However I will say the best part was making predictions about what would happen to the crayons and then watching the boys giggle with delight as they first started to melt.

What you need:

  • Crayons
  • Hot glue gun
  • Canvas
  • Hair Dryer
  • Table cover/Drop cloth
  • Small sticks or picture of umbrella
  • Photo

What to do:

  1. Glue the crayons along the top of the canvas.
  2. If you are making an umbrella find some small sticks and glue them into place on the canvas. If using a picture, glue the photo onto the canvas.
  3. Tape a small piece of plastic over the photo to protect it from the dripping wax.
  4. Lay drop cloth under canvas where you plan melting. Take it from me – the wax may fly in unanticipated directions so unless you want to scrape wax off of your table (like I did) cover it!
  5. Turn the hair dryer on high heat and hold a few inches away from the crayons. You will need to keep it in the same spot for a minute or so until the crayon begins to melt.
  6. Continue across the canvas with all of the crayons until you are satisfied with the amount of “rain.”
  7. Remove plastic and let dry.
Standard
Preschool Activities, Uncategorized

Rain Painting ☔️

It was a rainy day and we decided to use it to our advantage… I found a stack of old watercolor paints so we crushed up what remained with a hammer, sprinkled it on watercolor paper, and set it outside in the rain. 

After the paper dried we made three unique art pieces… first we traced and cut umbrellas, next we drew a city underneath fireworks, and finally created a large tree. It was amazing how we each saw something different while looking at the watercolor paintings… I guess it’s all about perspective ✨

This was the perfect STEAM spring activity and once again a lesson in sustainable play – remember to try and think about other ways to use things before you throw them out ♻️😊

What you need:

  • Old watercolor paints
  • Watercolor paper
  • Toy hammer
  • Baggies
  • Baking sheet

What to do:

  1. Scoop out hardened water color paints and place inside of a baggie.
  2. Use toy hammer to crush into small pieces.
  3. Scatter water color pieces onto watercolor paper.
  4. Place paper on a baking sheet and set out in the rain.
  5. Watch and be amazed! *Don’t leave the paper outside for too long or you will end up with a soggy mess!
  6. After the paper dries turn your painting into a masterpiece! Trace and cut, follow the lines, add drawings – it’s up to you and your imagination!

Standard
Preschool Activities, Uncategorized

Nature Paintbrushes

With the change of seasons the items in our nature collection are changing as well and we couldn’t help but notice the unique shapes and textures they each have. To explore this more I tied some of the items to sticks using twine and turned them into paint brushes!

What you need:

  • Sticks
  • Items from nature
  • Twine/string
  • Scissors
  • Paint and paper


What to do:

  1. Collect items in nature that have various textures.
  2. Tie each nature item to a stick using the twine.
  3. Dip in paint and create!

Standard
Preschool Activities, Uncategorized

Chalk Bombs

Spring is finally here and we’ve been looking for new ways to enjoy the warm weather! This idea came about when I discovered last year’s sidewalk chalk in the garage – most of which were small and broken, but know what they say: one man’s trash is another man’s treasure! The good thing when it comes to young children they don’t really care about “used” or “broken” – as long as you use it in a NEW way there’s fun to be had! The general rule in our house is don’t throw it away until mom says we can’t use it anymore 😉

What you need:

  • Sidewalk Chalk
  • Pantyhose or tights
  • Scissors
  • Hammer

What to do:

  1. Cut the feet off of the pantyhose.
  2. Place a piece of chalk inside.
  3. Use the hammer to crush the chalk into a powder.
  4. Secure with a knot.
  5. Throw at the ground or at each other for a burst of color! 

For video of the chalk bombs in action check out my Instagram @preschoolforyou

Standard
Preschool Activities, Uncategorized

Coffee Filter Butterflies 🦋

A classic preschool activity that never gets old! We usually do this with markers but I thought it would be fun to use dabbers instead and it actually made the colors “bleed” a lot better. This is such a great activity to teach the symmetry of butterfly wings along with so many other STEAM learning objectives!

What you need:

  • Coffee filters
  • Markers or Circle Dabbers
  • Spray bottle
  • Clothespins

What to do:

  1. Fold coffee filter in half.
  2. Decorate with dabbers/markers.
  3. Spray with water so colors blend.
  4. Open and let dry.
  5. Gather in the middle and secure with clothespin.
Standard
Preschool Activities, Uncategorized

Bird’s Nest

My youngest discovered a bird’s nest that had fallen out of a tree on our morning walk. Something most of us would have passed right by but his watchful eye spotted it instantly. After returning home I set up a tray of nature materials and coffee dough inviting him to make a nest of his own!

What you need:

  • Play doh – I used homemade coffee dough – click here for the recipe!
  • Nature collection (sticks, leaves, acorns – anything you can find outside)
  • Small pieces of string or paper (I repurposed some packaging paper)
  • Something small to represent eggs. We used fuzzy pom poms but you could also cut some out of paper, paint rocks, use plastic eggs, or make some with play doh.

What to do:

  1. Offer the materials and let your child create! The joy of these “invitation to play” set ups is that the learning is organic and happens on its own. During these types of activities it’s important to ask open ended questions (questions that require more than a yes or no answer) to help facilitate learning. These questions provoke meaningful thoughts and conversations and help extend learning – all while playing at the same time.

Some examples of open ended questions about bird nests:

  • “How do you think birds make their nests?”
  • “Where do the birds go in the winter time?”
  • “Why do you think birds live in nests?”
  • “If you were a bird, where you make your nest?”
  • … and when in doubt… just ask “why?”

Standard