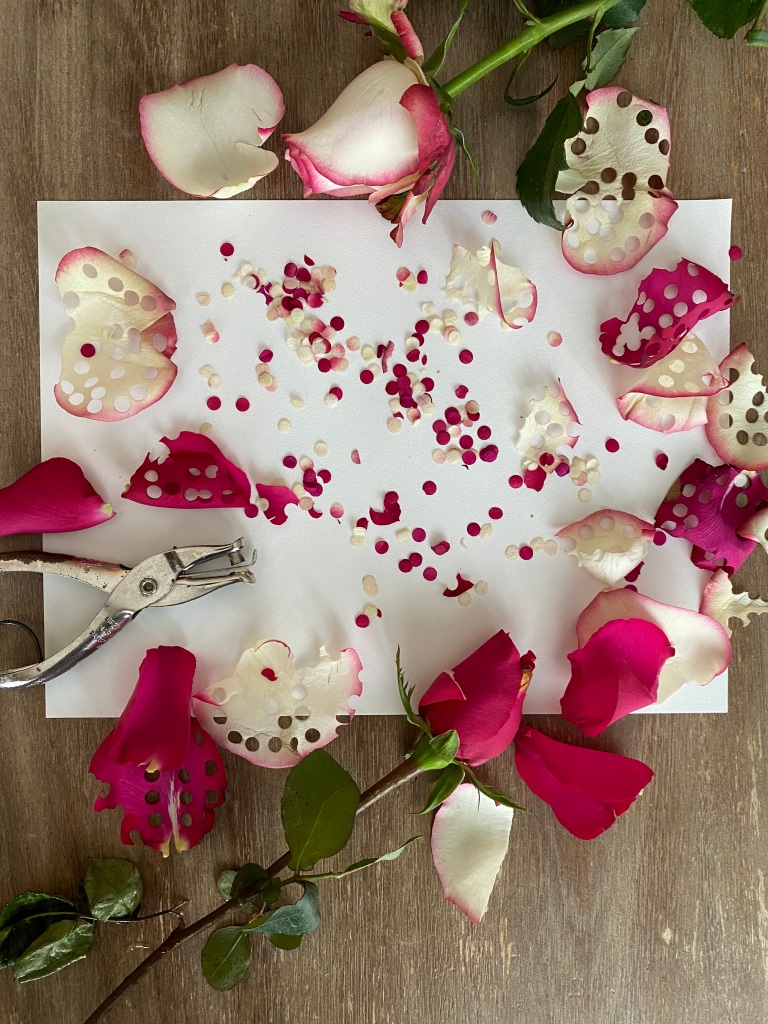
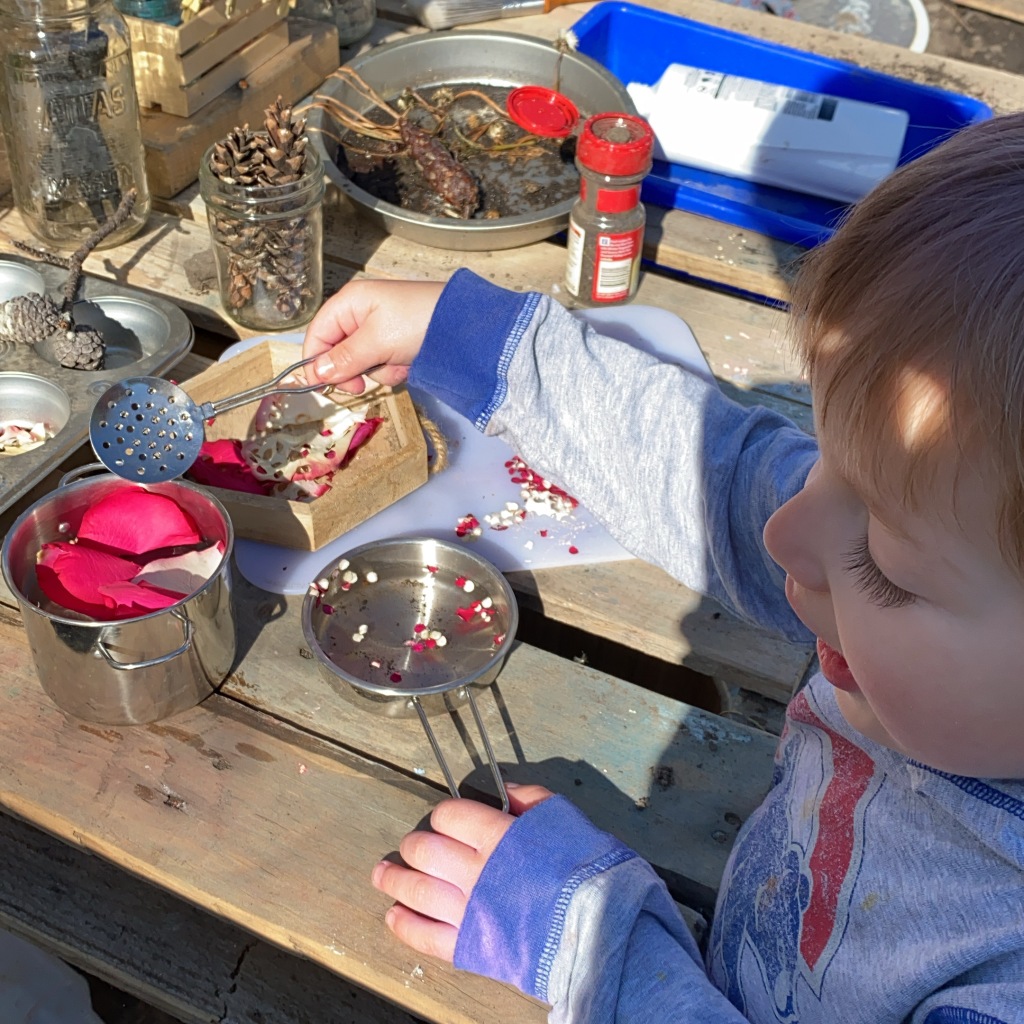
Don’t throw away those flowers just yet! Grab a hole punch and strengthen those little fine motor skills while making confetti – what you do with it is up to you! We took ours out to the mud kitchen and made potions that not only looked beautiful but smelled good too!
What you need:
Flowers
Hole Punch
What to do:
Gently remove petals from stem.
Use hole puncher to create confetti.
Save in a jar, use for an art project, or take outside to play with!
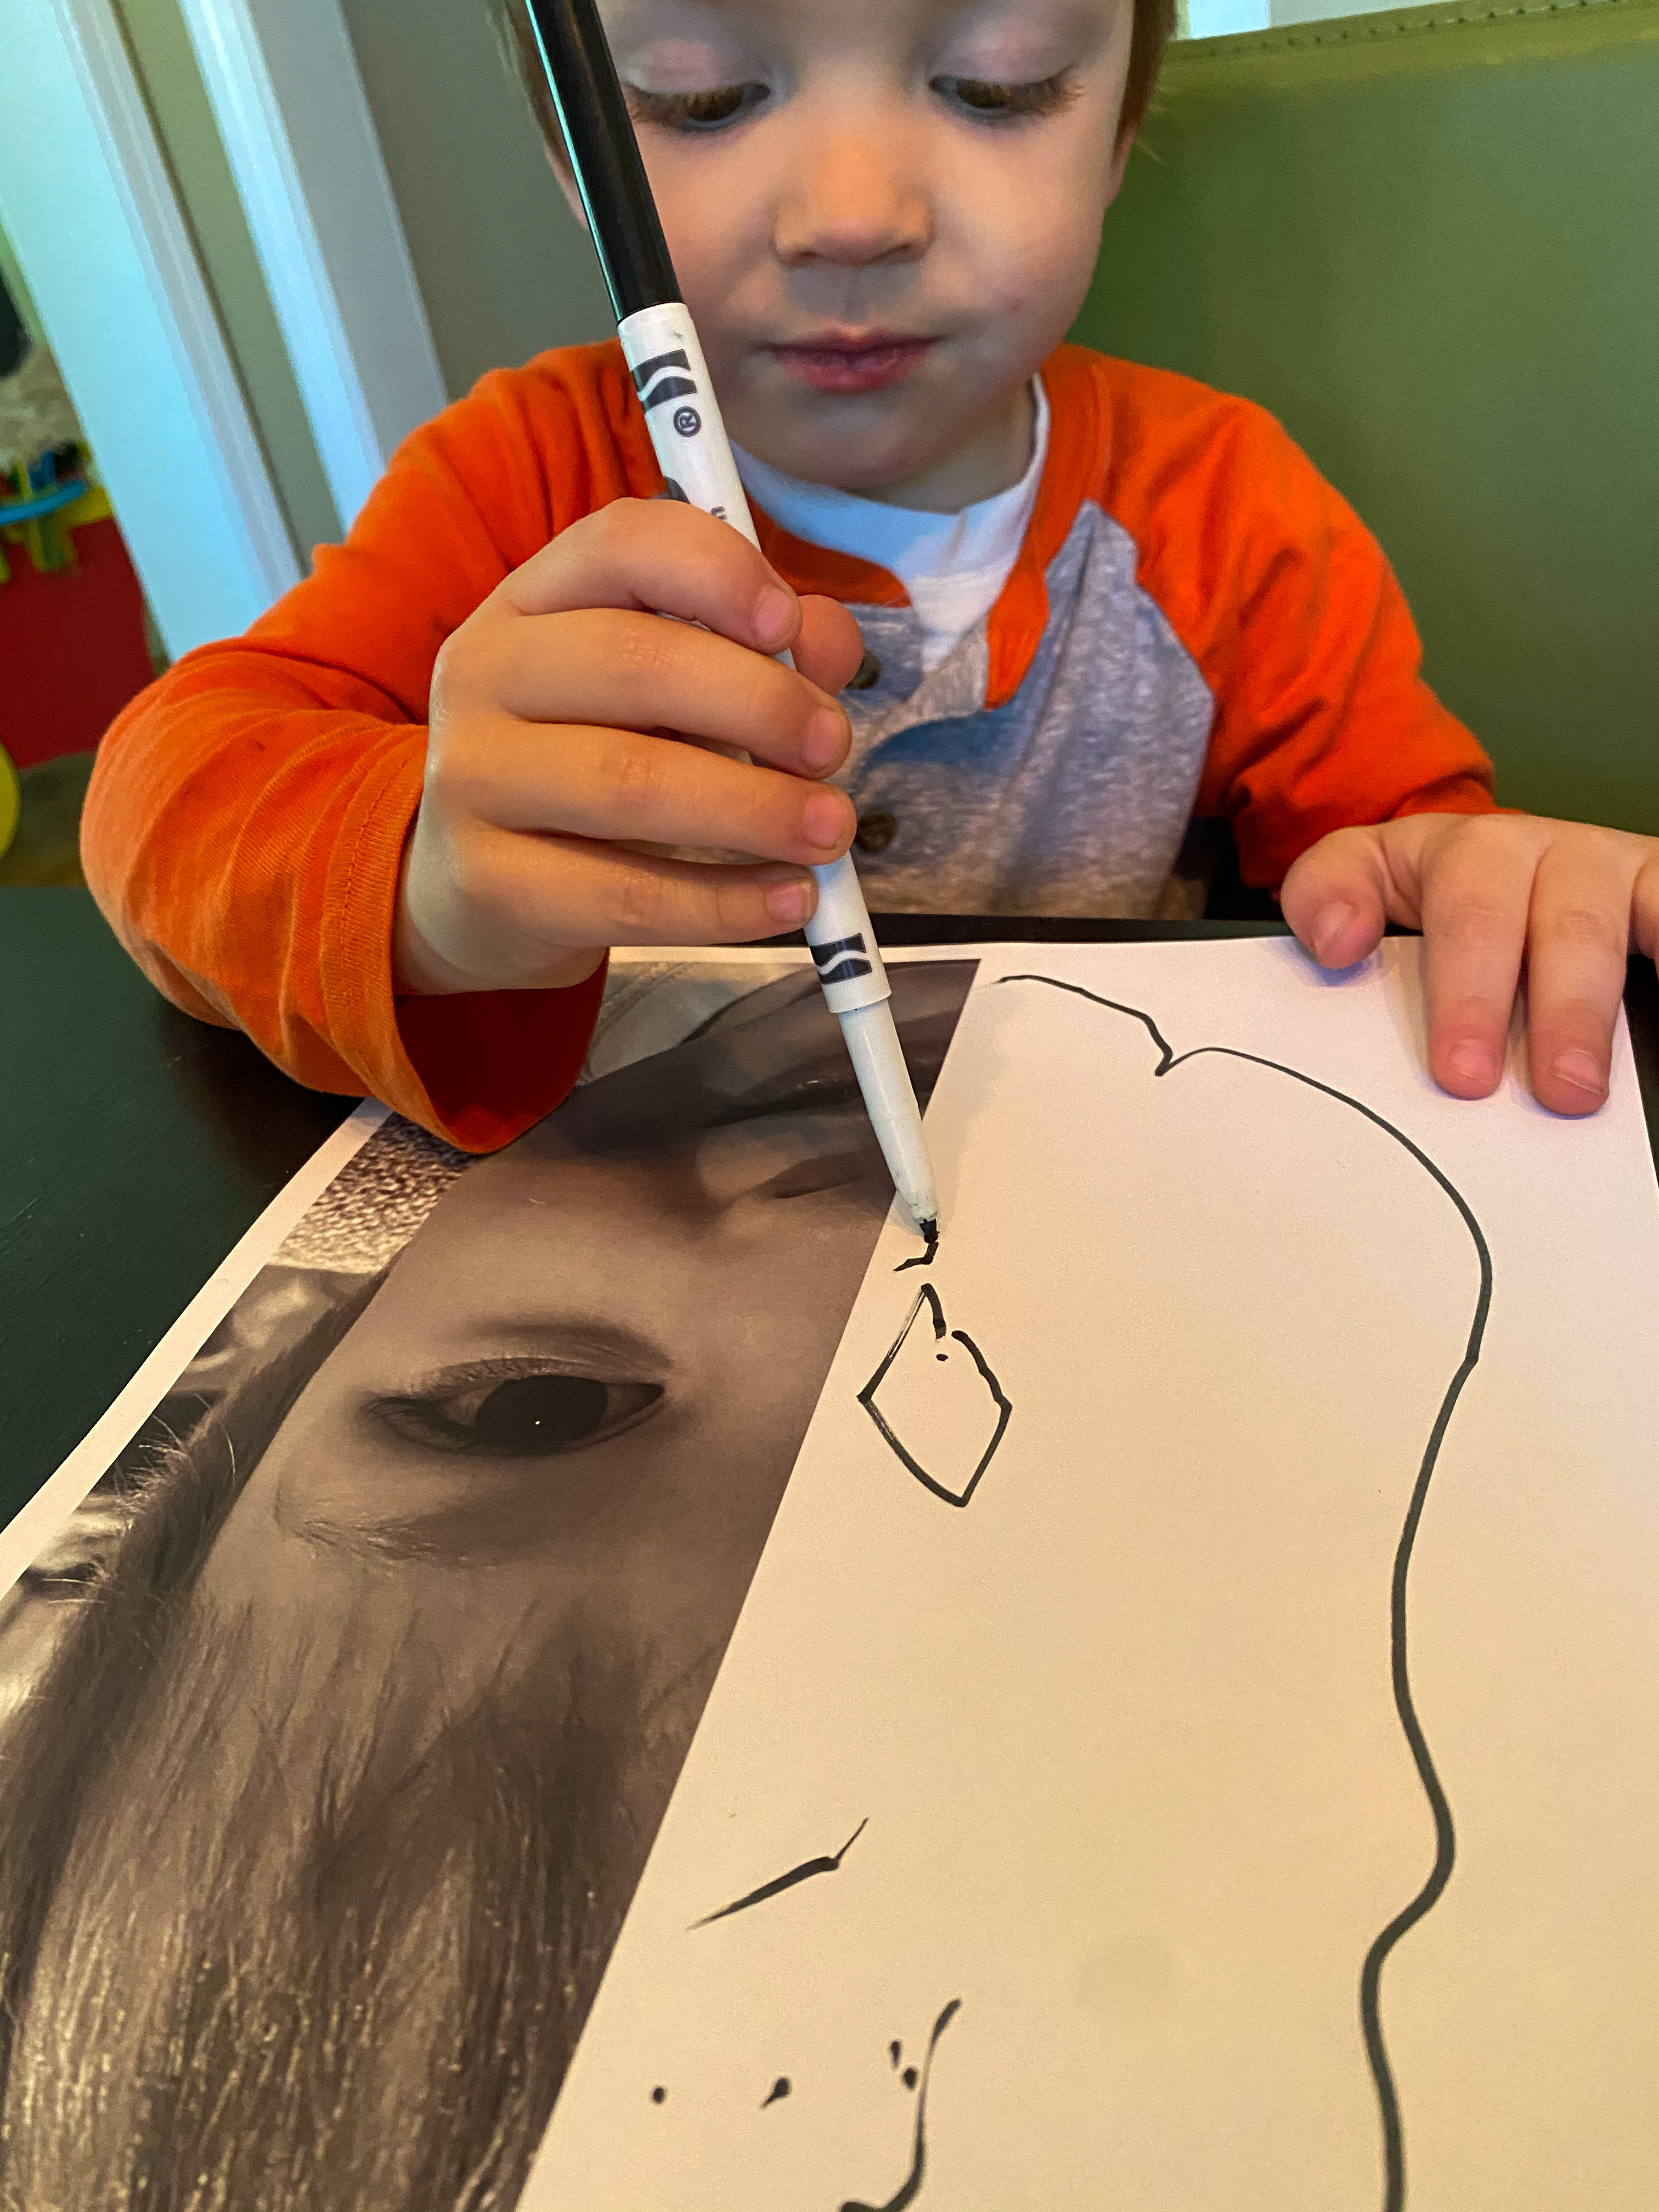
I have posted on the benefits of self portraits in the past (check it out here if you missed it!), but I thought I’d re-visit with a fresh take! Self portraits don’t always have to be a simple drawing of yourself – why not change it up? For this portrait we discussed symmetry as we looked in the mirror. I then printed pictures of half of their faces and had the boys complete the other side. Some other mediums to use when exploring self portraits are: clay, wire, chalk, and paint… get creative!
What you need:
Printed photo of half a face
Marker
What to do:
Look in a mirror – discuss what you see!
Introduce the word “symmetry” and explain what it means. Revisit the mirror and see how symmetrical your faces are!
Offer the half picture of your child and have them complete the other side.
If you have done self portraits in the past, take them out and compare the progress – the proof is in the details 😉
Have a dying bouquet of flowers? Don’t throw it away just yet! Have your kids cut, dissect, and identify the different parts! In this activity you will be counting, sorting, fine motor strengthening, sharing ideas, and working together… learning through play is the best!
What you need:
Flowers
Scissors
Bowls
Marker/Paper
What to do:
Label the bowls: Stems, Leaves, and Petals
Using the scissors have your child cut the flowers apart and sort the pieces.
Ask open ended questions: Do all flowers have the same parts? How do the different parts feel? What senses are we using? How do you think flowers grow? Why do you think these flowers are dying?
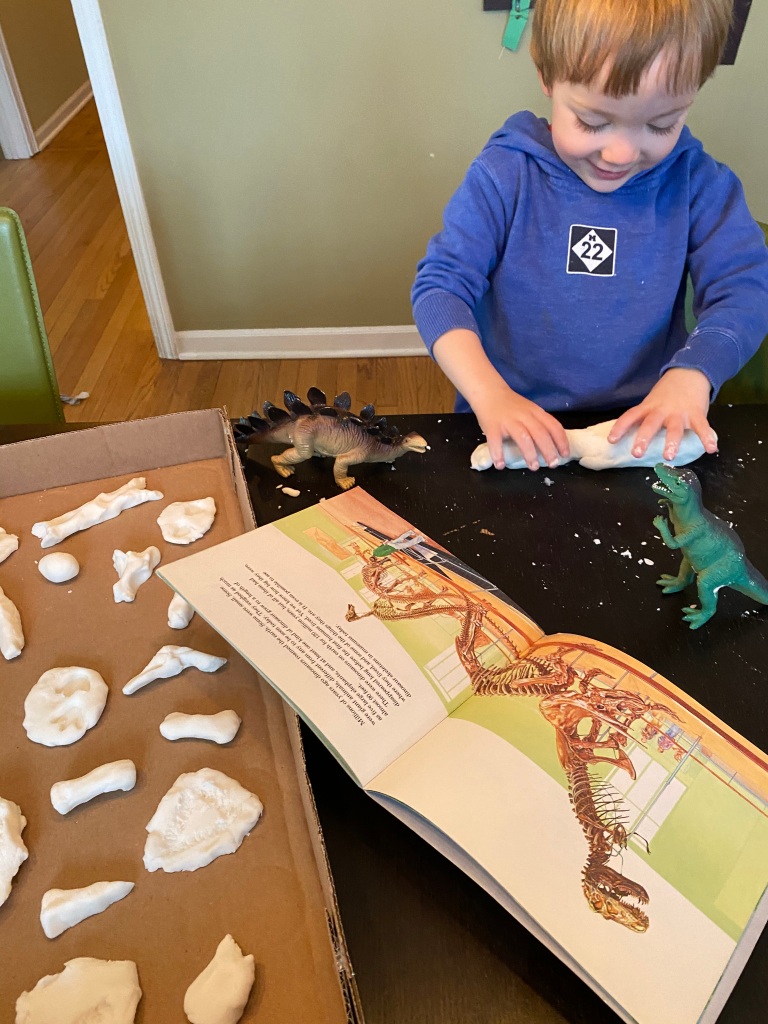
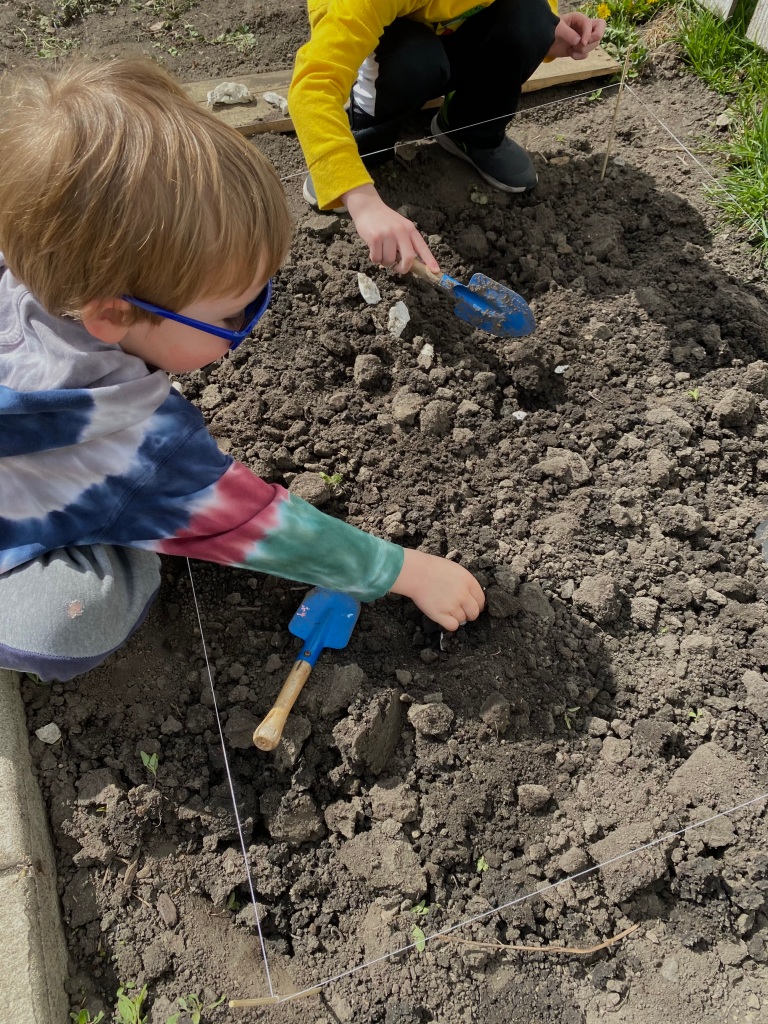
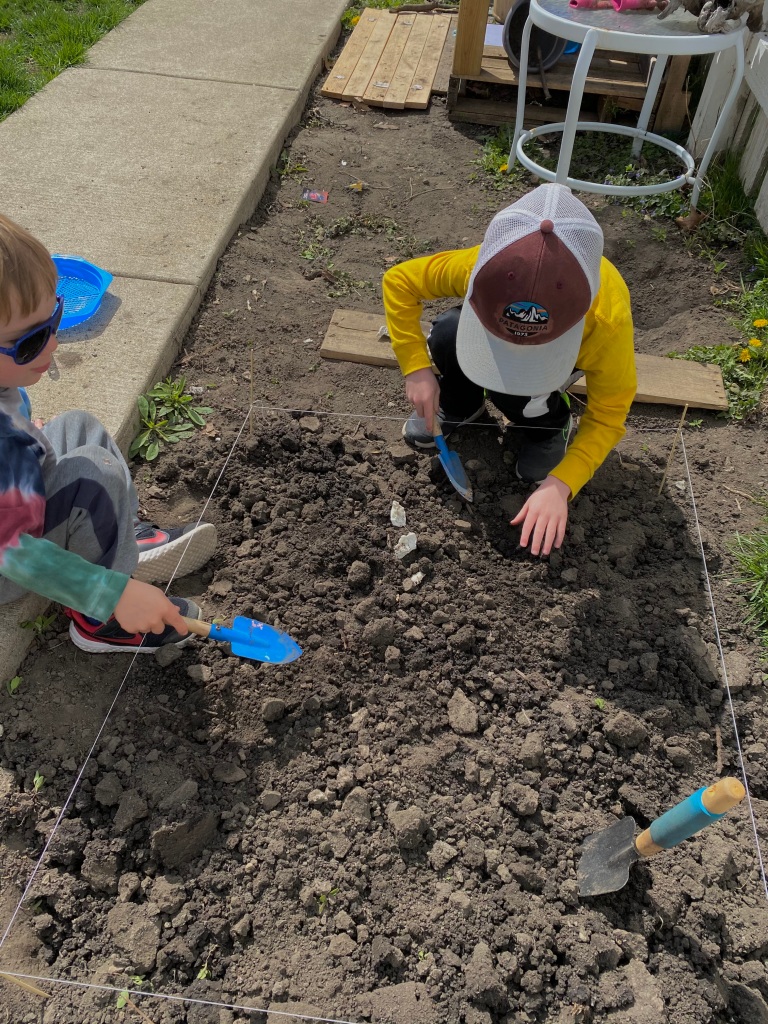
This was a two part activity- both were so much fun! First we made our own dinosaur bones and fossils out of homemade clay, then I buried them in our garden for the boys to dig up. They used shovels and sifters to find the bones and then cleaned them with paintbrushes. I honestly have no idea if they found them all… I’m hoping we discover a few more that were left behind when we plant our vegetables in a few weeks!
What you need:
Baking Soda
Cornstarch
Water
Measuring Cup
Pot
Shovels & Sifters
Skewers
String
What to do:
For the clay:
Mix 2 cups baking soda and 1 cup cornstarch.
Stir in 1 1/2 cups water.
Place over medium heat, continuously stirring until it thickens and becomes dough like (about 10 min).
Let cool and knead – adding cornstarch or (baking soda) as needed to reduce stickiness.
Use immediately or wrap in plastic wrap and store in refrigerator.
To make bones we just used our hands and molded until they looked like bones. For the fossil prints we used toy dinosaurs to make footprints and also pressed different parts of their bodies (teeth, tail, etc.) into the clay.
For the dig:
Find a good plot of dirt and dig to loosen the soil if necessary.
Use 4 skewers and string to rope off the prepared area.
Bury your bones and fossils – not too deep!
Invite your child to be paleontologists and dig for the dinosaur bones.
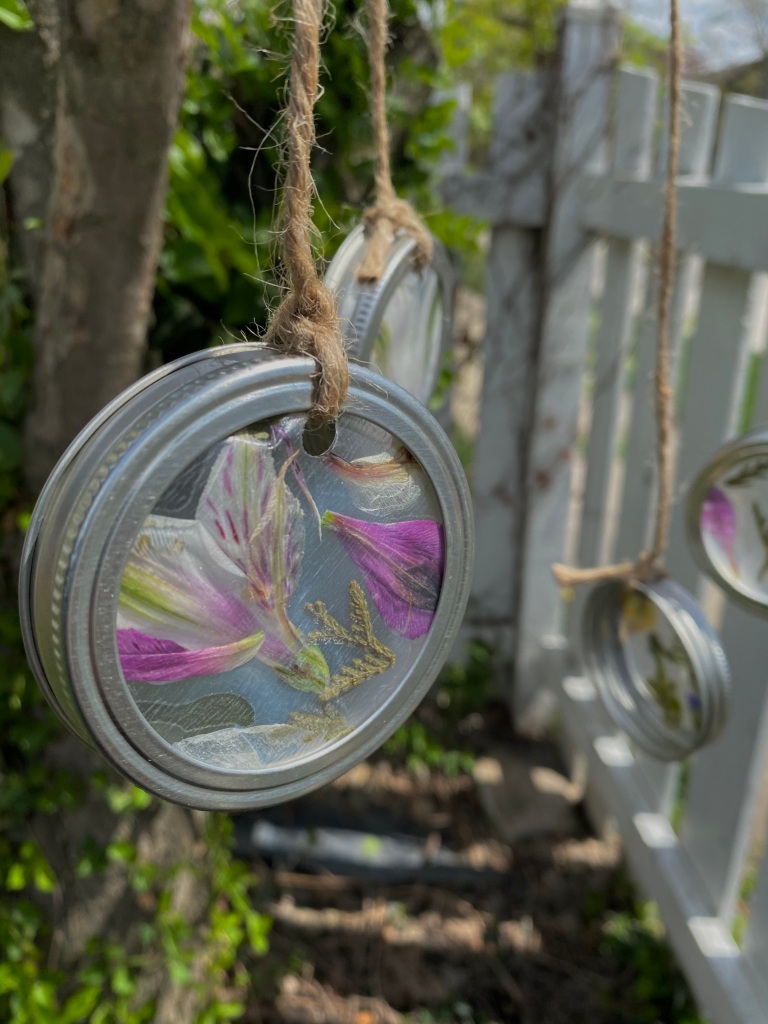
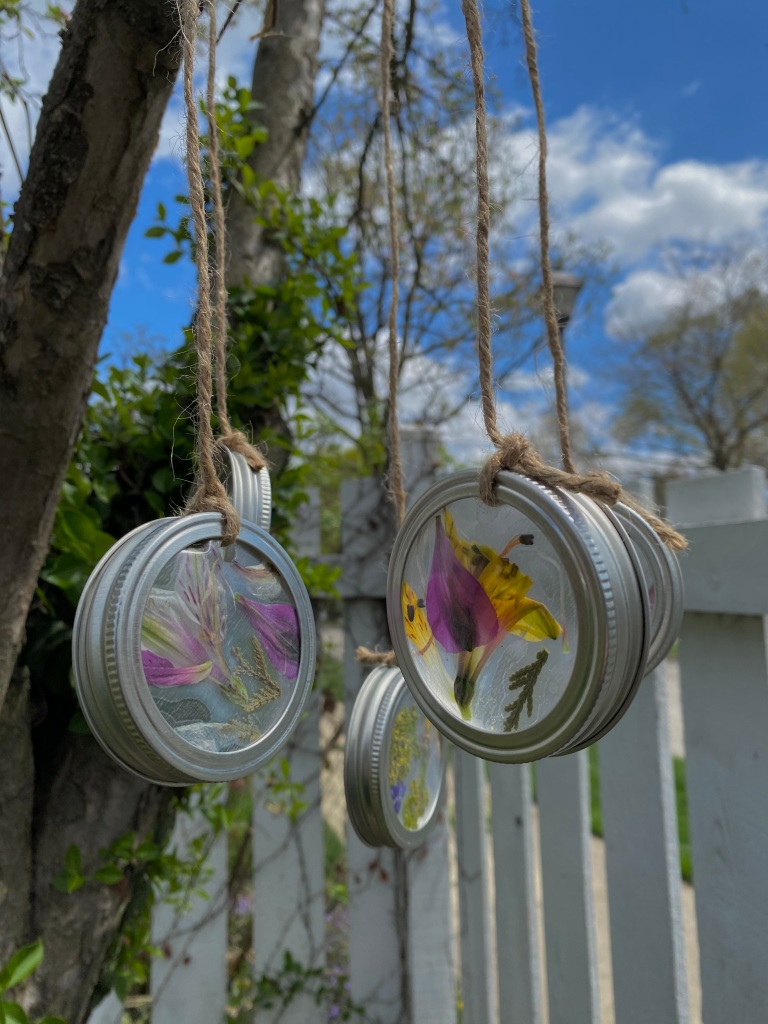
We have seen and felt the wind this week so now it was time to take a moment to stop and listen. Its funny how long it took to capture only the sounds of our chimes… we kept getting interrupted by cars, dogs, neighbors and airplanes. It can be so noisy in the bustle of the day but when you do find that moment of peace and can hear only nature – it’s music to your ears.
Unfortunately this platform does not support video but if you would like to see our wind chimes in action check out my Instagram @preschoolforyou 🙂
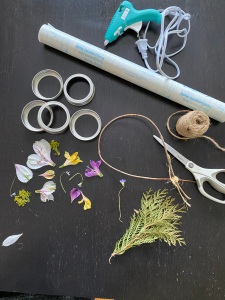
What you need:
Mason jar lids (without the middle circle part)
Contact paper
Flowers
Twine
Bendy stick
Scissors
Hole Puncher
Glue
What to do:
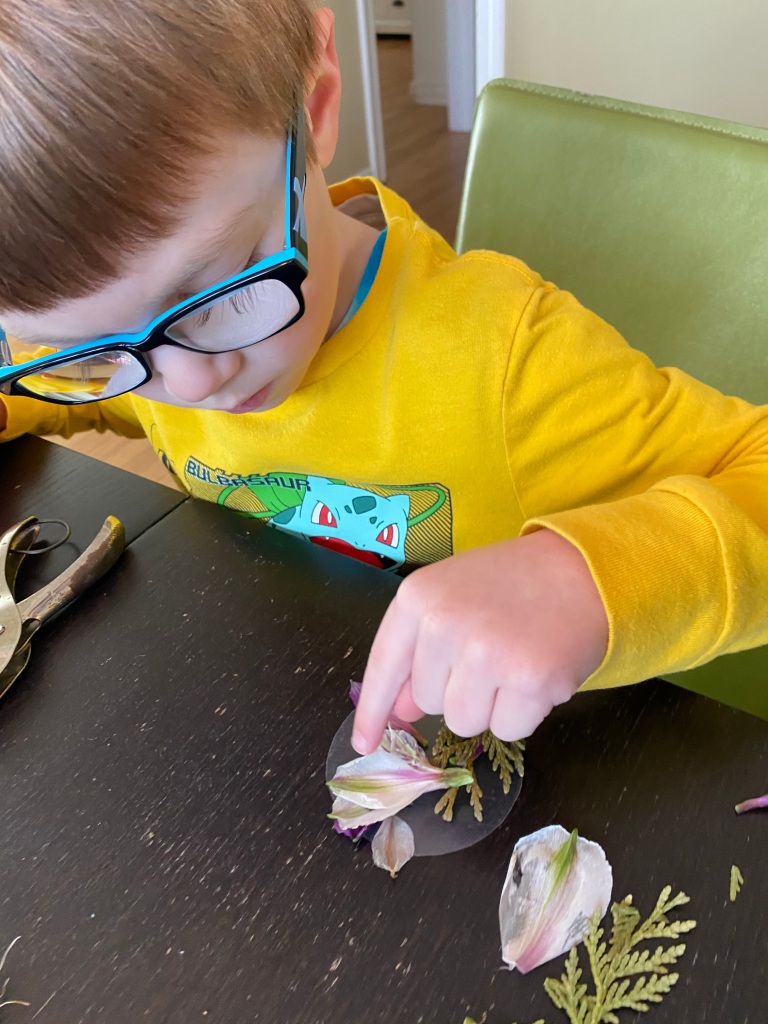
Cut circles out of the parchment paper the same size as the middle of your mason jar lid. You will need two circles for each lid.
Fill the circles with flowers and/or items from nature. *Helpful tip: The night before you plan to do this project, press your flowers to help them lay flat on the parchment paper.
Place another parchment paper circle on top of the one with flowers to seal.
Punch a hole in the top of the circle.
Glue the circle inside of the mason jar lid.
Tie a piece of twine to the lid.
*Repeat steps 2-6 for as many “chimes” as you want.
Take your bendy stick and tie it in a circle.
Tie the lids onto the stick. *When I first did this project I wasn’t happy with the amount of sound it made so I added some hollow mason jar lids in the center and it made it much better! You could also add other metal objects such as old silverware or nails, screws, etc.
Once all your chimes are tied into place hang outside and wait for the wind to blow!
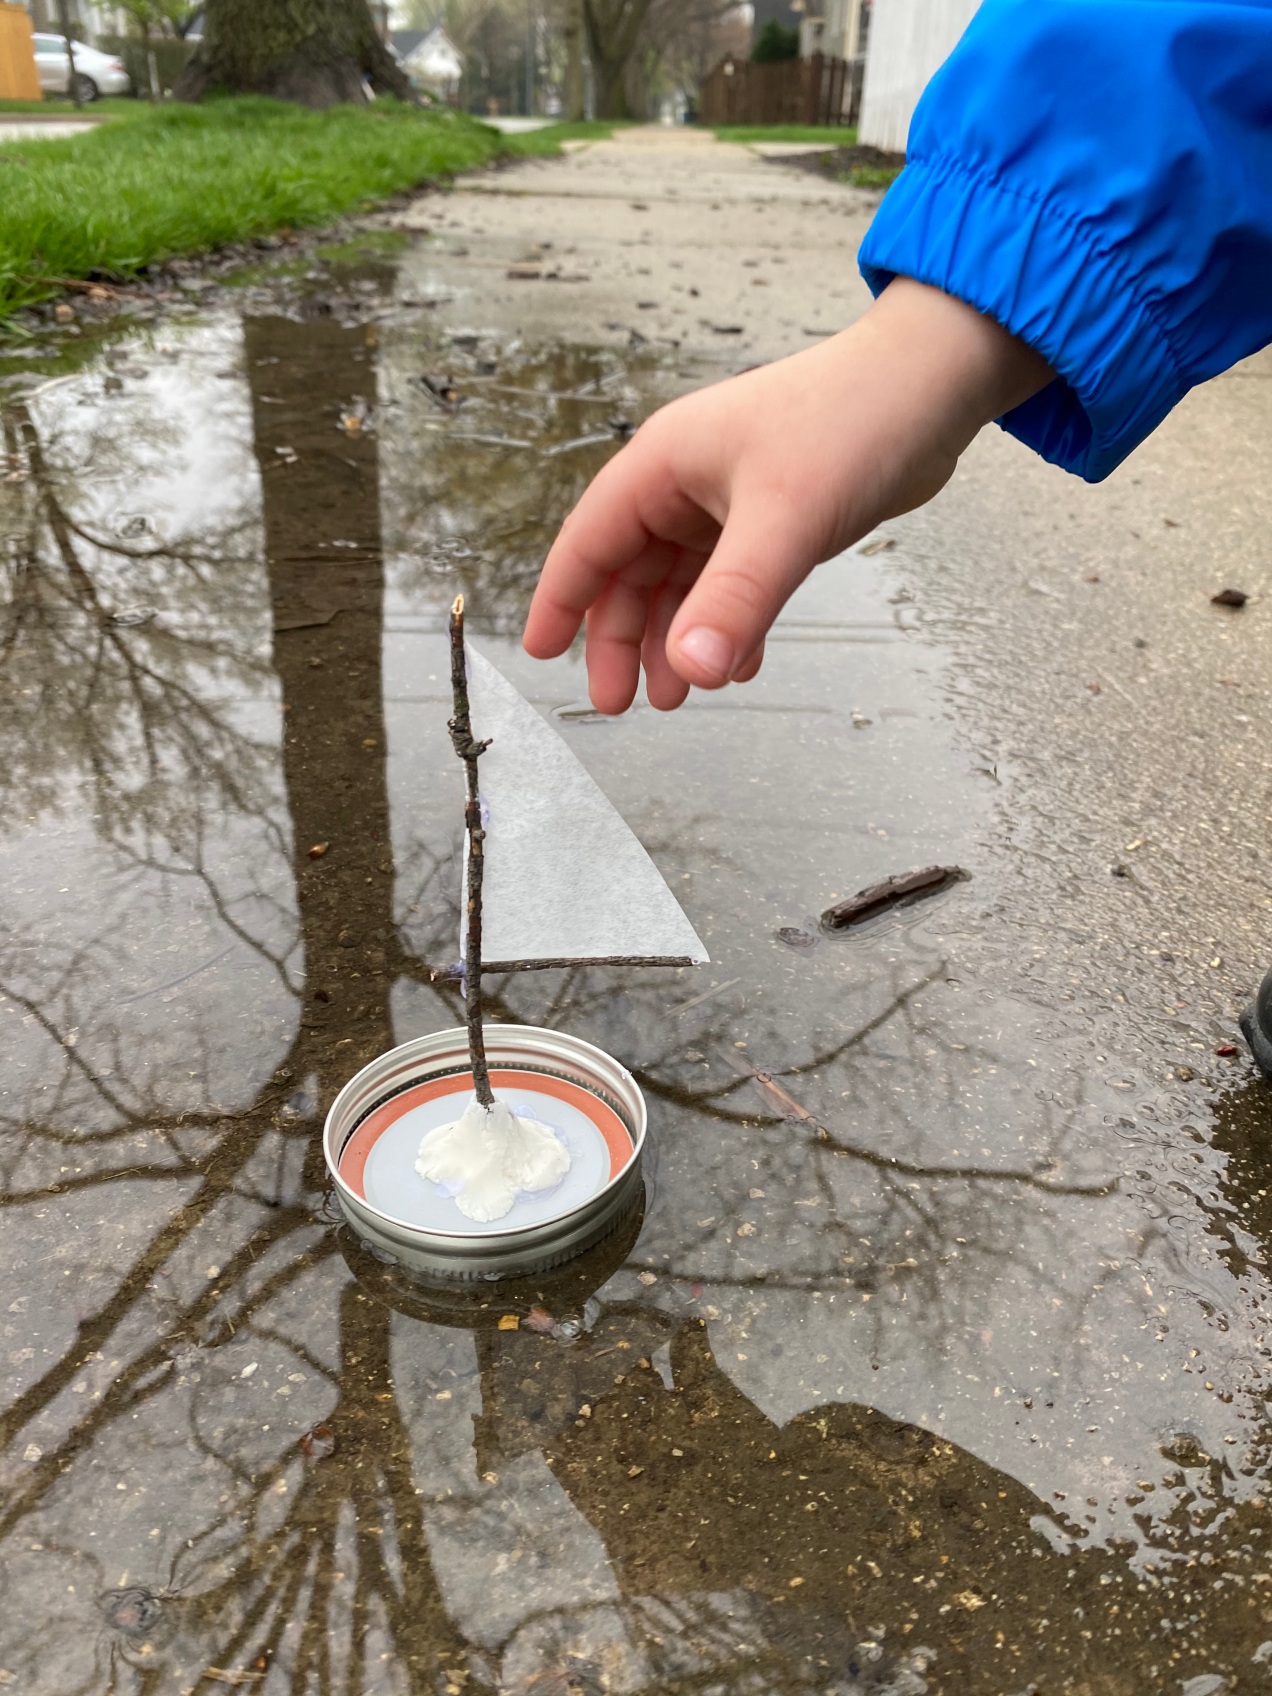
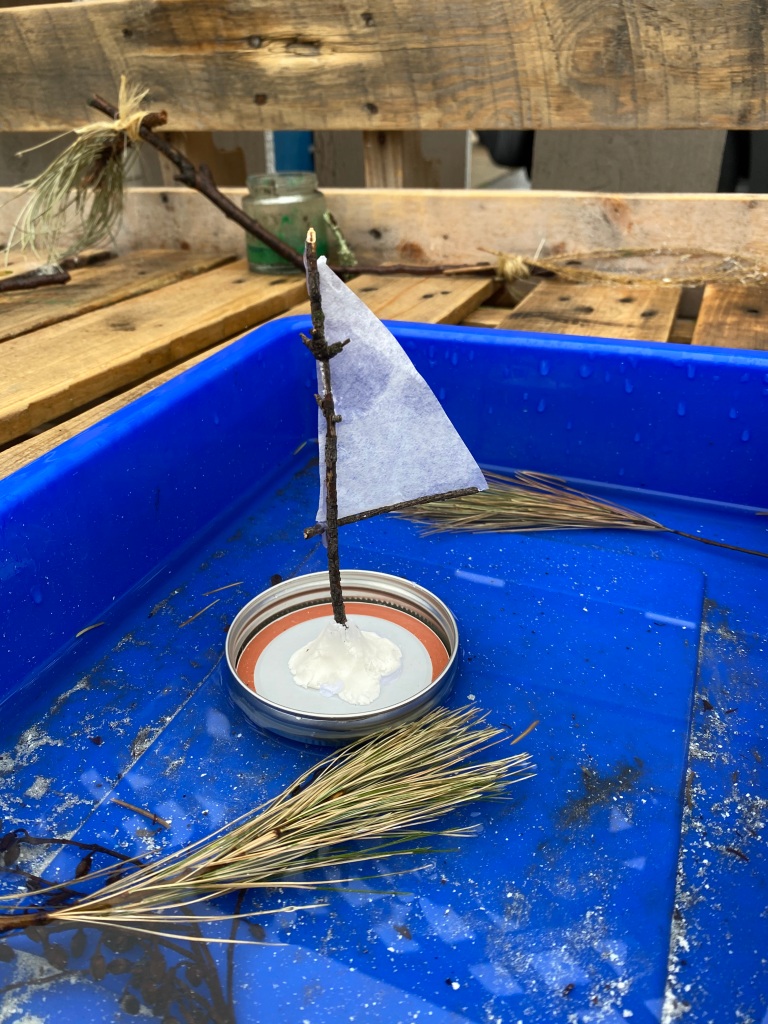
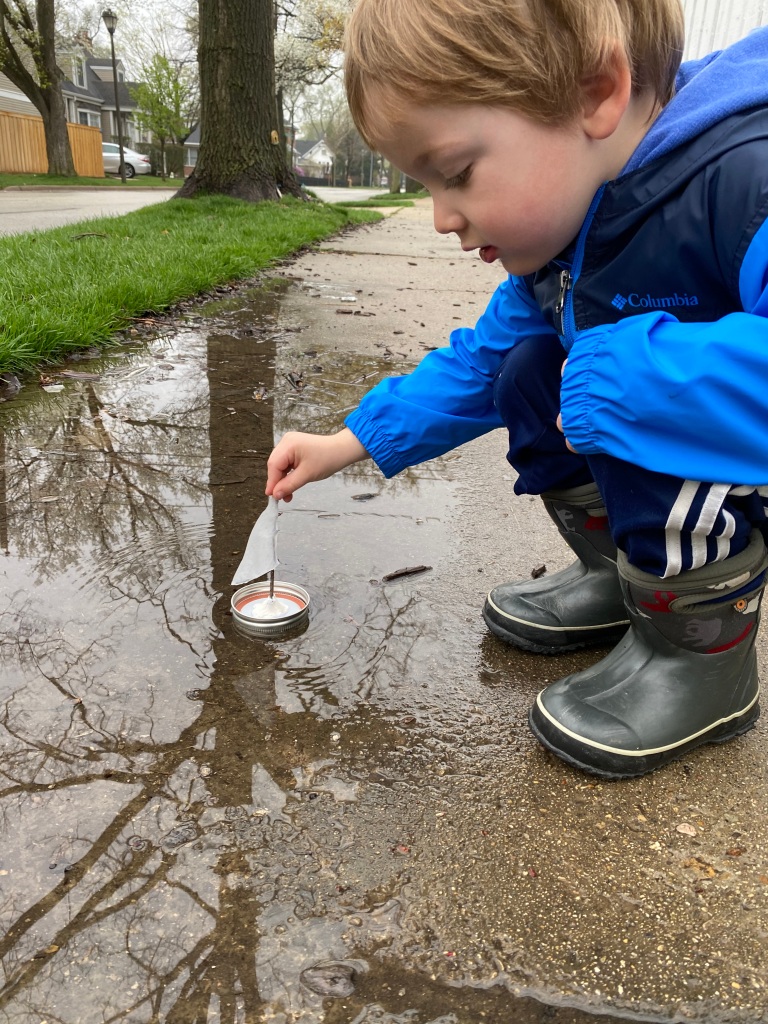
This simple boat was so much fun and a great lesson in the power of wind. I grew up sailing with my dad on our own tiny sailboat and I’ve always loved it – there’s just something about the moment when the wind hits the sail and you zoom across the water – it really shows the beauty of Mother Nature ✨
What you need:
Mason jar lid
Small piece of clay or play-doh
2 sticks (one shorter than the other)
Coffee filter
Scissors
Glue
What to do:
Place a small dab of clay in the middle of the mason jar lid.
Put the longer stick in the clay and secure with glue.
When the stick is sturdy, glue the other stick perpendicular to the other one.
Cut the coffee filter in a triangle shape with the sides the same length as the sticks.
It was a rainy day and we decided to use it to our advantage… I found a stack of old watercolor paints so we crushed up what remained with a hammer, sprinkled it on watercolor paper, and set it outside in the rain.
After the paper dried we made three unique art pieces… first we traced and cut umbrellas, next we drew a city underneath fireworks, and finally created a large tree. It was amazing how we each saw something different while looking at the watercolor paintings… I guess it’s all about perspective ✨
This was the perfect STEAM spring activity and once again a lesson in sustainable play – remember to try and think about other ways to use things before you throw them out ♻️😊
What you need:
Old watercolor paints
Watercolor paper
Toy hammer
Baggies
Baking sheet
What to do:
Scoop out hardened water color paints and place inside of a baggie.
Use toy hammer to crush into small pieces.
Scatter water color pieces onto watercolor paper.
Place paper on a baking sheet and set out in the rain.
Watch and be amazed! *Don’t leave the paper outside for too long or you will end up with a soggy mess!
After the paper dries turn your painting into a masterpiece! Trace and cut, follow the lines, add drawings – it’s up to you and your imagination!
After exploring the moon we broadened our horizons to the rest of the sky. We learned about stars, constellations, the Northern Lights, and of course, the planets! Rather than put them in separate posts, I thought it’d be helpful to have them all together – so here are the rest of our space projects….
Sun Catcher Planet Mobile
What you need:
Broken crayons
Wax paper
Pencil sharpener
Scissors
Iron
Clear string
Stick
What to do:
Use the pencil sharpener to grate the crayon wax. You’ll need different colors to represent the different planets.
2. Place the crayon wax on a small square of wax paper. Place another piece of wax paper on top. (I placed them on a hot pad from the kitchen!)
3. Use a hot iron (on its lowest setting) to melt the wax. IMPORTANT: Do not press down firmly or it will melt everything and ruin your iron! Just tap lightly until melted.
4. Cut into a planet shape and attach string.
5. When all of your planets are made, tie them onto a long stick and hang in the sunlight!
Papa, Please Get the Moon for Me
This one of my favorite booktivities! “Papa, Please Get the Moon for Me” by Eric Carle was one of our favorite moon themed books during our study. After reading it (several times) we built our own ladder out of sticks to climb to our painted moon ✨
What you need:
Papa, Please Get the Moon for Me by Eric Carle
Construction paper
White Paint
Sticks
Photo of kids
What to do:
Read “Papa, Please Get the Moon for Me”
2. Paint a moon towards the top of the construction paper. I used a stencil that I cut out of another piece of paper to make sure the moon stayed round and in place 😉
3. Use the sticks to create a ladder and glue into place.
4. Cut out the photo of your child so that it is just him/her. Glue onto the ladder to make it look like they are climbing!
5. Lastly, we added a few paint splatters to look like the stars.
I also made on of these for my mom and added the words “Love you to the moon and back” – needless to say she loved it ❤
Northern Light Chalk Drawing
While discussing constellations with the boys I was reminded of a photo that my dad took a few summers ago… One night we were fortunate enough to see the Northern Lights outside our family’s cottage in Northern Michigan. In one of the pictures my dad took the Big Dipper is as clear as day. We found the picture and I was instantly inspired to try and re-create the magic.
What you need:
Chalk
Construction paper
Paper towel
Silver sharpie marker
What to do:
If not familiar, introduce your child to the Northern Lights by showing them pictures, looking for books at the library, or doing a simple Google search! Here are some fun facts we learned through our research:
We can’t see the all of stars and constellations outside of our house because of “sky glow” or light pollution. You can only see them when it’s very dark outside!
The Northern Lights appear when tiny particles stream out of the sun and hit the Earth’s atmosphere.
Aurora Borealis is another name for the Northern Lights. Aurora is the the Roman god of the dawn and Borealis is the Greek name for the north wind. ✨
Photo Credit: My dad!
2. Color heavily with the chalk along the bottom of the paper. *Optional: To recreate the lake and tree I covered the bottom and side with another piece of paper so that it remained black.
3. Using the paper towel smear the colors together.
4. Add the stars with the silver sharpie.
5. Remove overlay paper (if used) and you’re done!
Happy space learning! I’d love to see any of your work if you try these projects – feel free to email them to me!
I discovered after a closet clean out that I’ve been hoarding recyclables – so we used them to build a rocket ship and blasted off to space!
What you need:
Boxes
Recyclables
Markers
Glue
What to do:
Build, stack, glue, draw, play and use your imagination – there is no right or wrong way to do it! We left our rocket ship in the living room for almost an entire week and every day the boys would rebuild and rearrange – it was never ending fun!
Bring a little color into your home with this fun painting project! Explore light and shadows, color mixing, and let your creative energy flow!
What you need:
Painters tape
Washable tempera paint
Dish Soap
Water
Small jars or containers
Paint brushes
What to do:
1. Mix your paints: In small containers put a few tablespoons of paint, a drop of dish soap, and a splash of water. Sorry I don’t have an exact recipe – consistency can differ depending on types of paint etc. TIP: Don’t add too much water! Start with a little bit and then add more as needed.
2. Use the painters tape to create a design on your window. For ours we chose a rainbow!
3. Paint! Cover your design in different colors of paint and don’t worry if it drips, that’s what the dish soap is for – easy clean up!
4. Let paint dry completely.
5. Remove tape. You may need to do some touch ups with a paper towel and windex if your paint bled through the tape.
6. Enjoy the colors and shadows!
And here are some pics from last time we did this project 😉